 Pat Flynn
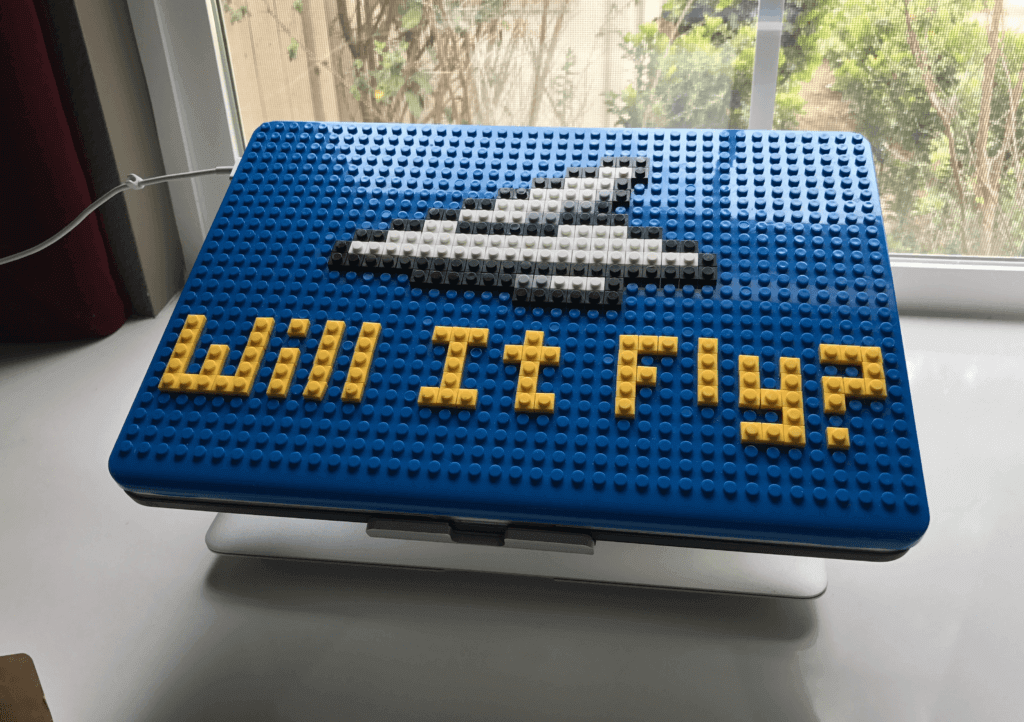
Whenever I travel anywhere, I bring my laptop, and on my laptop there’s a laptop cover that everyone seems to ask about. It comes from Brik Book, and it’s a LEGO-compatible cover. It’s awesome.
I interviewed the founder of Brik Book, Brett Miller, way back on Smart Passive Income Podcast Session #217, and since then he’s been doing even more to grow the company, including a new product that was recently released called Brik Tile. Using the same launch model, he utilized Kickstarter, and crushed it.
I wanted to bring Brett back on the blog today to write a guest post related to his crowdfunding journey, and how we might be able to follow his lead. He’s got an amazing and incredibly detailed overview of the entire process for you below, so if you’re looking to launch your new product soon, pay attention. Here’s Brett Miller, founder of Brik, with the scoop.
“The value of an idea lies in the using of it.”
Thomas Edison
Have you ever had a great idea but failed to act on it? After decades of building products and starting companies, I can tell you that ideas are worthless without execution. Entrepreneurs are often bombarded with a constant stream of “great ideas,” but fail to get those ideas off the ground.
Luckily, it’s never been easier to launch a product or start a company. Crowdfunding has opened the door and allowed ANYONE to share their ideas or products with the world. My business partner and I both have art degrees from liberal arts colleges. We have no special connections with journalists, and we’re not personal friends with Mark Cuban (of Shark Tank). That didn’t stop us from using Kickstarter to launch a million dollar company in less than three years while traveling the world and building products we LOVE.
If you have a great idea and you’re willing to put in the effort, this is the guide for you.
What You Need:
- Good idea
- Computer
- Camera (Smartphone will do)
What You Don’t Need:
- To quit your job
- Fancy equipment
- Startup capital
Setting Up the Campaign
Kickstarter vs. Indiegogo vs. Independent
There are several companies out there for crowdfunding. The big players are Kickstarter and Indiegogo. These platforms are similar so it really comes down to personal preference. Some companies skip crowdfunding and go straight to pre-orders on their website. We used Kickstarter and we’ll continue to use Kickstarter every time we launch a new product. The math is simple: Kickstarter takes 5 percent off the top when your campaign ends (if successfully funded). That doesn’t include the 2 to 3 percent for credit card fees. But you’re going to pay those anywhere you accept credit cards.
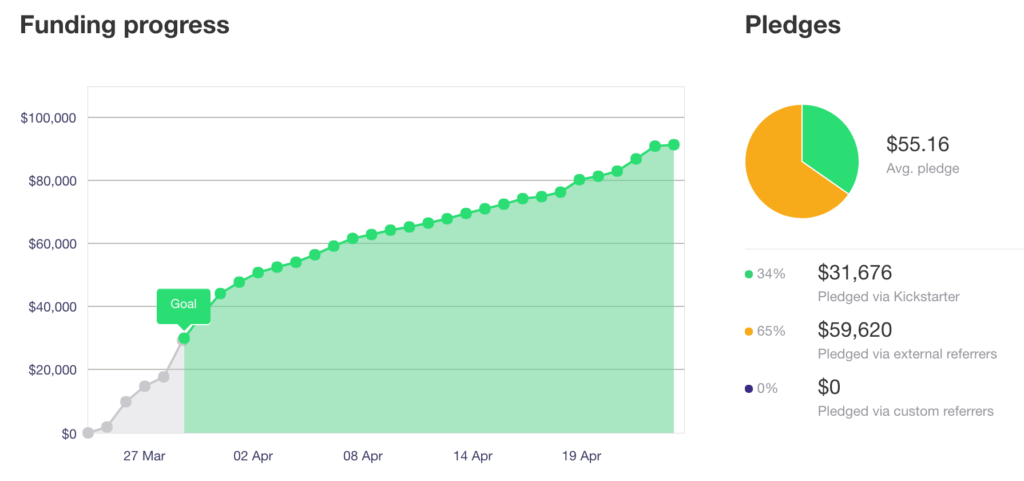
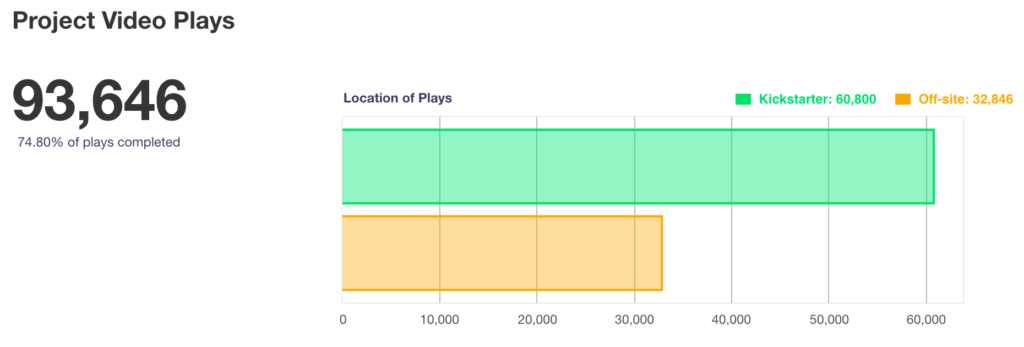
As seen in the chart below, Kickstarter drove 34 percent of our Campaign #1 pledges. That means that Kickstarter was driving traffic from Kickstarter.com to the Brik Book (LEGO Compatible MacBook Case) campaign. Kickstarter brought us over $31,000 worth of pledges, but only took around $4,500 in fees. What a great deal!
Campaign #1
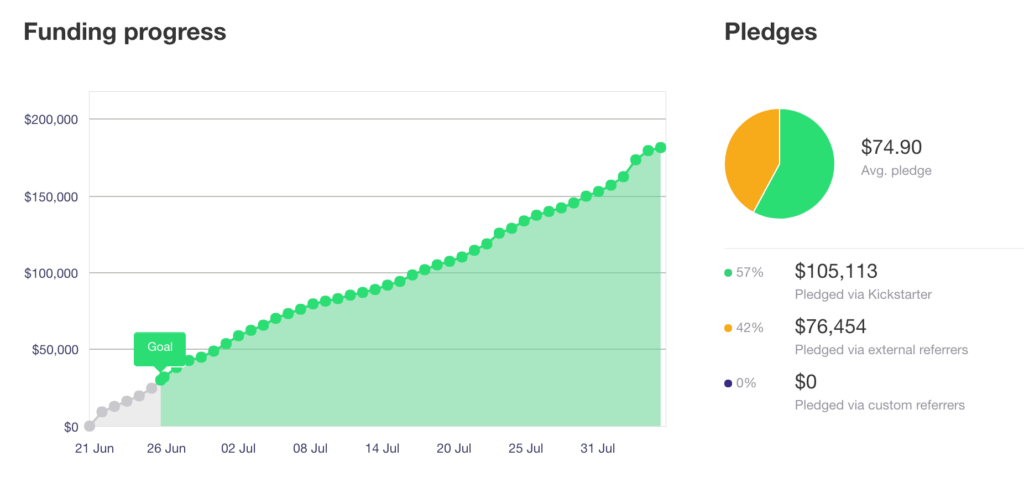
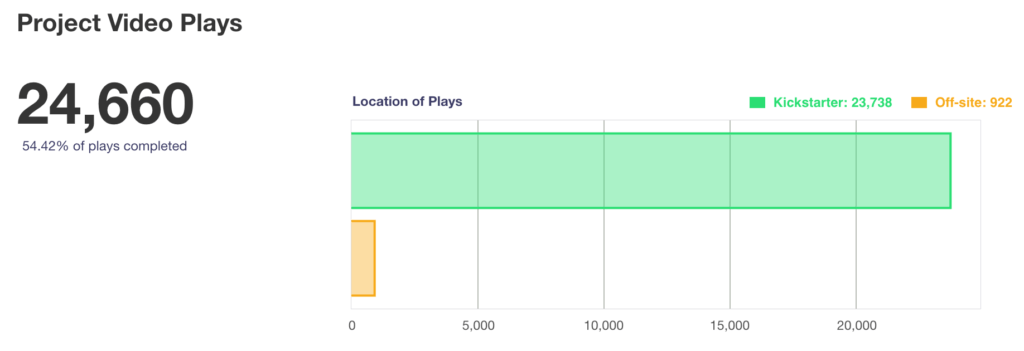
On Campaign #2, Brik Tile (LEGO Compatible Wall Tiles), Kickstarter drove 57 percent of our pledges worth over $100,000. That’s $100,000 worth of pledges for less than $10,000 in Kickstarter fees.
Campaign #2
The algorithm Kickstarter uses to drive traffic to campaigns is believed to be largely based on momentum and conversion rates, but we’ll get into that in a bit. Outside of being a trusted brand and handling all of the payment capturing, Kickstarter does a great job bringing traffic to your campaign. You just need to create a little momentum first.
The Video
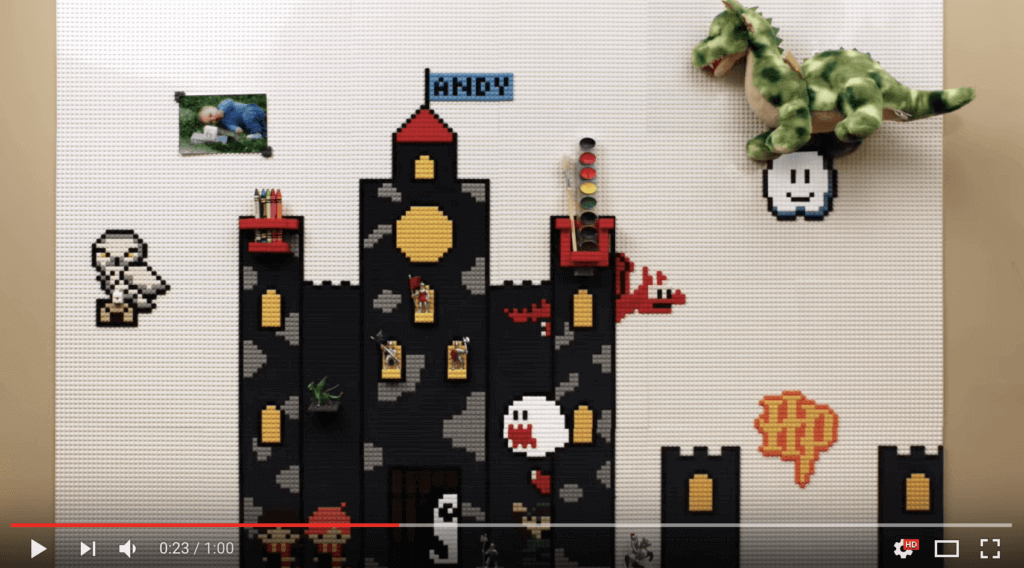
You don’t need fancy cameras or editing software to build a professional looking Kickstarter campaign. We shot our entire Brik Book Kickstarter video using an iPhone and edited it on iMovie. Good lighting is the most important factor for getting professional looking photos and videos. Spend the time at the beginning to set up the lighting properly. It’ll be worth it.
I’ve seen a lot of crowdfunding videos that dive right into the product features and specs. I recommend captivating your viewers on an emotional level first. Show happy, smiling faces using the product with some upbeat music in the background. You can find great royalty free music on iTunes. Just search for “royalty free.”
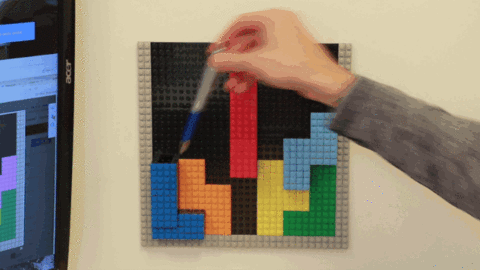
Get to the point, quickly! Our first video was thirty seconds and 75 percent of viewers watched the full video. Our second video was sixty seconds long and was only watched in full by 54 percent of viewers. Most viewers won’t watch your entire video. Show the benefits early to engage the viewer, then elaborate.
Brik Book Video (thirty seconds): 75 Percent Completion Rate
Brik Tile Video (sixty seconds): 54 Percent Completion Rate
Images
Perhaps the most important piece of media for your project is your primary campaign photo. It needs to be clear and obvious. Use the Kickstarter Image Guide for additional help. Taking some of the key product benefits and displaying them as photos is also great for backers who want to browse your page, but not watch your entire video. You can also turn these into animated GIFs using online tools like GIPHY to make them more attention-grabbing. Here’s an example of one we use on our website.
Selecting Reward Tiers
It’s easy to go crazy during this section and offer too many reward tiers. Doing that will complicate the fulfillment process and could actually hurt your pledges (paralysis by analysis). I recommend five to ten different tiers. You always have the ability to add more tiers when the campaign goes live. Backers are vocal; they’ll let you know if you need to add another tier.
Setting a Raise Amount
Caution: Spend the time to get accurate quotes before determining the amount you need to raise. We seriously exceeded our budget on our initial campaign. Luckily, we raised 300 percent of our funding goal or we would have needed a loan to get the product to market. Here are a few expenses you need to consider:
- Tooling: If you’re building a physical product.
- Prototypes: Make them early and often. They’re expensive, but can save you thousands in the long run.
- Packaging: Packaging is your customer’s first impression with your product. Good packaging can range from $1 to $5 per unit.
- Shipping from the manufacturer: Plan ahead so you can ship by sea freight instead of air. It’s typically about one-fifth of the price.
- Shipping to your customers: You can get in big trouble here. Spend some time talking to USPS, FedEx, UPS, and fulfillment centers to determine what your costs will actually be. Products are often heavier when packaged causing shipping to get very expensive. Going back to your backers to ask for more could kill your campaign credibility.
- Legal expenses: Do you need a patent? Utility patents can cost between $15,000 and $30,000 to file properly. With a provisional, you might not need to pay all of that up front though. Talk to your lawyer.
After you’ve put an estimate together, double it! That doesn’t mean double the price you’re charging, it just means to double to the amount you need to raise overall. You’re bringing a product to market for the first time. Things will go wrong. You’ll experience delays. Packages will get lost. You’ll need the extra cash.
Setting a Delivery Time
Setting up a delivery time is tough. We were four months late on our first campaign and one month late on our second campaign. Give yourself a six-month buffer. Most backers won’t care if your product ETA is in the distant future, but they absolutely will care if you miss your deadline. If it’s your first campaign, avoid setting a delivery date between September and January. We ended up shipping both products in late November. Shipping fees around the holidays can cost up to five times more than normal. We spent over $25,000 on importing our products from China on the last campaign in order to get them out before Christmas. If we would have set the delivery expectation for February, our backers wouldn’t have expected them as Christmas presents. We would have saved over $20,000. That’s wasted money that could have really helped grow our business.
Pre-Launch
Build a Press List
Press is the easiest way to gain initial traction for your campaign. Start with blogs that your customers are likely to read. If you have a technology product, check out Gizmodo, Wired, and other sites that are likely to write about tech. Find the authors on those sites that like to write about products similar to yours or other crowdfunding campaigns. If their contact information isn’t listed in the article, just search Google until you find it.
When we launched our Brik Book campaign, I reached out to ten journalists and five of them ended up writing article about our campaign. This is the subject line we used:
“(Author’s last name) fan launches Kickstarter campaign 🙂 Your Macbook just got a lot cooler”
Adding the author’s last name personalized the email.
Here’s the full email content:
Hi (author’s first name) — I’m a big fan of your work in (website). I just launched a Kickstarter campaign today that I thought your audience might find interesting.
http://brikcase.com
Keep up the great work!
Brett
Journalists usually get dozens of pitches or more a day. It’s important to keep the message short, but provide enough information to spark their interest. Pro tip: Add the YouTube link for your campaign video at the bottom of the email. If they are using Gmail, the video is automatically loaded at the bottom so they don’t even need to leave the email to check out your video.
Journalists like to write about products that are new and unique. Find ways to highlight the original benefits of your product.
Friends and Family
Discuss your launch with friends and family members before the campaign goes live. Make sure they are committed to backing you on launch day. If you can’t get any family members or friends to donate to your campaign, ask them why. Use their feedback to modify your campaign so you can proactively address those objections and present a solution.
When we originally pitched Brik Book to our friends, nobody got excited about it. Then we built the prototype, and they thought it was cool. Then we shot the video, and they thought it was awesome. Then when Brik Book was on the homepage of Wired, they thought it was a genius idea! Sometimes you just need to paint the picture clearly so others can see what’s already in your head. 🙂
Launch
Kickstarter has to approve your project before you can make it live. Make sure to submit it a few days in advance so it’s approved and ready to go the moment you flick the switch.
Text your friends to start getting contributions and build credibility for your campaign. After you have a few contributions, start emailing those journalists!
Don’t forget to reach out to influencers that might be interested in your product. We sent several messages to bestselling author, Guy Kawasaki. Eventually he tweeted a photo of our product to his followers—over one million of them. Persistence pays off. People are busy. Silence is not the same thing as no.
Stretch Goals
After you’ve successfully reached your funding goal, you can add stretch goals. Some of our stretch goals include new Brik Book colors, a Brik Removal Tool, and an exclusive backer badge. Stretch goals are not required, but they are a fun way to get your backers to continue to promote your campaign even after they’ve already pledged. If you reach the next level, you can add another goal and another prize.
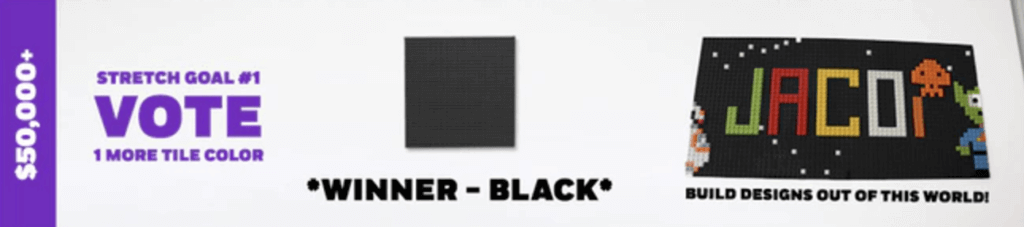
Warning: Think very carefully before adding new stretch goals. We added two new colors for Brik Book as a stretch goal. We were offering four MacBook models, so adding two colors increased our stock keeping unit (SKU) count by eight. It was an inventory nightmare. Keep the stretch goals simple and work hard to reduce the amount of variants you offer. We couldn’t decide on a stretch goal color for the Brik Tile campaign, so we let the existing backers vote. It helped us engage with our backers and made it easy to identify the most wanted new color: black.
Momentum
Keep hitting the email lists. Some journalists need to see momentum before they write about you. If they haven’t responded, email them again after you reach a milestone (e.g., reaching your funding goal).
Campaign partnerships are also a good way to build momentum. Find a live campaign that has a similar target audience and email the founders to see if they’d be willing to promote each other’s campaigns.
If you’re still having trouble building momentum, consider a service like Funded Today. They help you reach your funding goal and take a percentage after the campaign ends. We’ve never used them, but we’ve heard about tremendous results for other campaigns.
Support
Backers are going to have a lot of questions, so it’s important to set up your support channels early. Kickstarter has a built-in messaging system where the majority of questions will be coming from. It’s a great tool while your campaign is live, but consider migrating to another tool after the campaign is over. We use Front to manage our support emails. It allows us to tag messages, set up groups, and assign messages to members of our team.
End of Campaign
After the campaign ends, Kickstarter takes about three weeks to process the payments from the backers and deposit the money into your bank account. When you’re ready to start manufacturing, send out your backer survey. The survey allows backers to select colors and add their shipping information.
Before sending your surveys, consider using BackerKit. BackerKit will reach out to backers whose credit cards didn’t process and give them the opportunity to try again. They also allow you to upsell your backers during the survey process. We were able to get an additional 10 percent in funds by allowing backers to purchase more Brik Tiles, Briks, and other products before completing their survey.
Updates
Backers love updates! This is a great opportunity to start building a life-long relationship with your backers. Use video when possible. Here are a few examples of updates we’ve done:
Halfway
Send an update to your backers when you’re halfway to your funding goal. We also included a behind the scenes video of how our Brik Tile LEGO Wall Kickstarter video was made. [Editor’s note: The video is no longer available.]
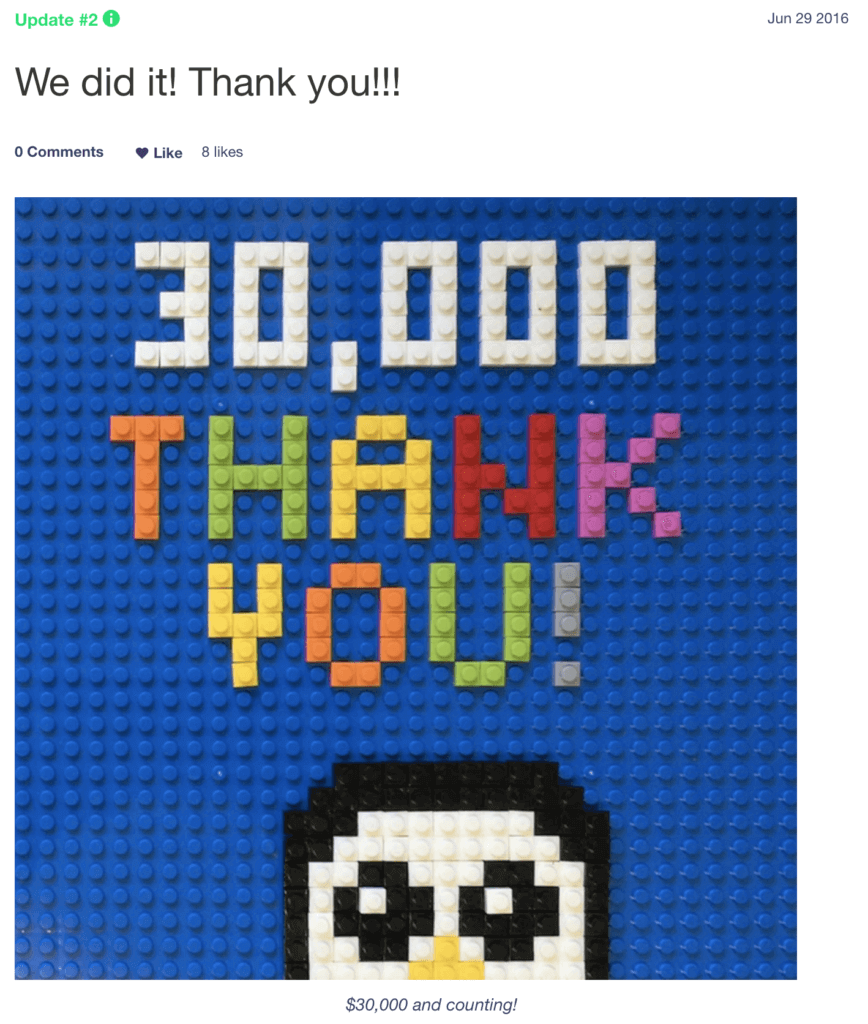
Thank You!
Send an update after your campaign is over to thank your backers. Try to incorporate your product or backers in some way.
Stretch Goals
Update your backers when you’ve hit a stretch goal.
Production
Production updates are my favorite. They give your backers a behind-the-scenes look at the production process: the first Brik Tile prototype demo. [Editor’s note: The video is no longer available.]
Surveys
Update your backers to remind them to complete their surveys.
Shipping
This one is very important. Some backers will be out of town or possibly ready to move. Make sure to send an update when your product starts shipping so they can check for a tracking number.
Production
“A delayed game is eventually good, but a rushed game is forever bad.” — Shigeru Miyamoto (creator of Super Mario Bros.)
Finding a Manufacturer
Personal relationships are key. Browse LinkedIn or Facebook to see if any of your friends can make an introduction to a manufacturer that they use. If not, Alibaba is also a great place to find manufacturers.
Try to visit your manufacturer as much as possible during the process. It’s amazing how many mistakes can be avoided when you catch them early. Visiting your factory also helps to build a strong relationship with your manufacturer for future projects.
Tooling
The steel molds used for injection molded plastic are often referred to as tools. Tools can range from a few thousand dollars to tens of thousands of dollars depending on the size and complexity of your project. In most cases, prototypes can be made using a CNC machine before you begin cutting your steel molds. We went straight to cutting the molds before having prototypes made on our first project. Big mistake. The cases didn’t fit and we had to spend $20,000 redoing the tools. Prototypes might sound expensive, but they’ll save you a fortune in the long run.
Shipping
We always have our new Kickstarter projects shipped to our warehouse to assemble and package before they go out to our backers. We’ve found several tiny mistakes that we were able to correct before shipping out the products. Once you’re confident in your quality control, find a fulfillment center so you can focus on building your business instead of filling orders.
Shipping from the Factory
As mentioned in the Campaign Setup section, give yourself time so you can ship your products by sea freight. It usually take about a month door-to-door, but it will save you a fortune in shipping fees. If you’re shipping from China, find a freight forwarder. They handle all of the arrangements for a small fee.
Domestic Shipments
USPS is great for lighter packages, but talk to a FedEx or UPS representative about discounted rates a few weeks before you begin shipping.
International Shipments
We used USPS for international shipments for our first campaign. It was the cheapest option, but it was very unreliable. There’s no tracking or accountability. We lost orders and created unhappy backers. It was a mess. For our last campaign, we used Asendia and they’re great. They are less expensive than USPS and they include tracking for most countries. If you’re doing fulfillment yourself, we highly recommend them.
Shipping Software
Don’t use spreadsheets. We used Google Sheets on our first campaign and it was a disaster. The data wasn’t organized well, cells weren’t updated properly, and it made support a nightmare. Eventually we found ShipStation and it changed everything. It automatically syncs with BackerKit, Shopify, and all of the major shipping providers so everything is in sync.
Fulfillment Center
If you don’t want to ship the packages yourself, fulfillment centers are a great option. You export a list of your backers, their address, and what items they’re suppose to receive. The fulfillment center takes care of the rest. The other advantage of fulfillment centers is that they ship a massive amount of packages so their shipping rates are extremely low. We normally ship a few hundred orders ourselves to make sure the product quality is up to our standards, then we migrate to a fulfillment center. ShipBob is a popular option for Kickstarter backers, and EasyPost has some great rates.
Ongoing Campaigns
If you deliver a quality product and provide great support, you’ll discover that your Kickstarter backers will be customers for life. When you decide to do your next project, you’ll already have a built-in audience, and reaching your funding goal will be even easier. When your first campaign ends, Kickstarter will provide you with your backers’ email addresses. You can use those emails to build “Lookalike Audiences” on Facebook for future ad campaigns.
Running a Kickstarter campaign is an enormous amount of work, but it’s SO MUCH FUN! We’ll be looking for all of your amazing new campaigns on Kickstarter!