Mindy Holahan Peters
“The energy of your business is directly tied to the strength of your email list.” Amy Porterfield has been giving us this advice for years—but how do you make sure your email list is strong? By “strong,” we mean that your subscribers are engaged in your emails, reading them and taking action on your suggestions and links. A foundational method for improving the strength of your email list is to start your subscribers off on the right foot with a useful email welcome sequence.
(And if you haven’t started an email list yet, then what are you waiting for?!)
What Is an Email Welcome Sequence?
A welcome sequence introduces the subscriber to you, your brand, and what you have to offer them. It shows them why it’s worth their time to stay subscribed to you. It’s your opportunity to show off the best of your past content and teach them how you would like them to engage with you and your content.
In this post, I’ll walk you through both the how and the what of setting up your welcome sequence. First, I’ll show you how you set up the sequence. For demonstration purposes, I’ll be using our favorite email service provider, ConvertKit, but if you’re using a different ESP, the advice will still be helpful. [Full Disclosure: As an affiliate, we receive compensation if you purchase through this link.] Look for the “If you’re using a platform other than ConvertKit” for how to adapt this to your own email service provider.
Then, I’ll walk you through what to include in your welcome sequence—which elements your emails need and what topics they should cover. Let’s dive in!
How to Set Up an Evergreen Welcome Sequence
This blog post is based on a four-part video series on the new Team SPI YouTube channel, which is our channel specifically for in-depth tutorial videos and community events. We publish new tutorials every Wednesday and periodically host live events. [Subscribe to the channel to get notified about livestreams and get the new videos in your feed.]
To set up an evergreen welcome sequence in ConvertKit, we’ll start by using one of ConvertKit’s automation templates. If you are new to automations, these templates make getting started much easier, as ConvertKit sets up all of the elements that you’ll need. I walk you through the process in the beginning of this video.
Once you are signed into your ConvertKit account, follow these steps:
- Go to the Automations section.
- Click on New Automation.
- Click on Browse Templates.
- Choose the automation template named Evergreen Newsletter.
This will copy four elements into your automation:
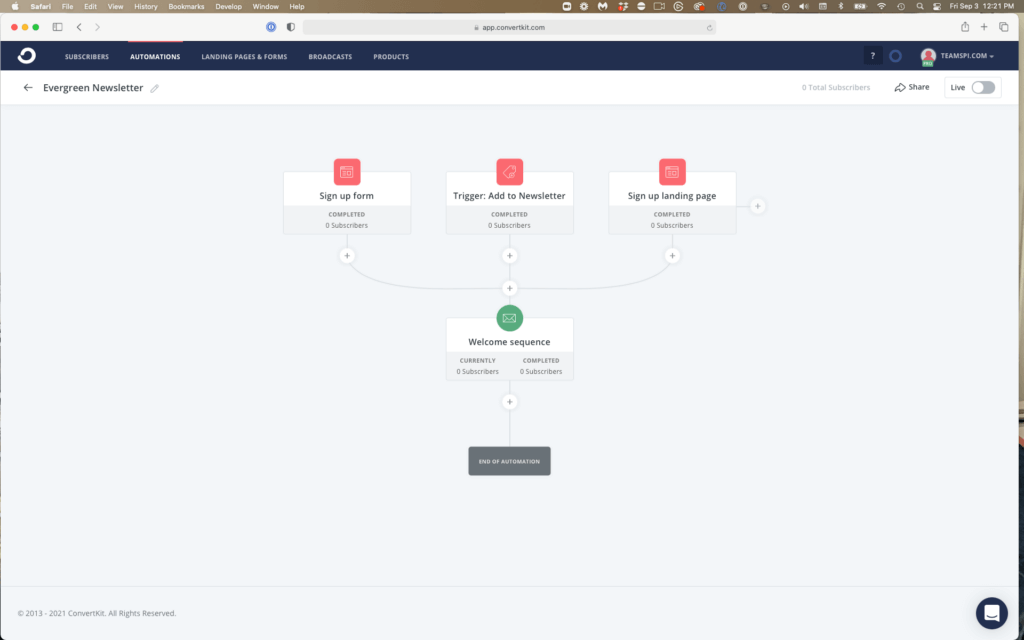
- A sign-up form
- A tag (sometimes also referred to as a “link trigger”) << I’ll cover why for our purposes, we probably won’t use this option
- A sign-up landing page
- An email welcome sequence
If you’re using a platform other than ConvertKit
If you’re not using ConvertKit but your ESP has an automations builder (other terms to look for: workflow builder or recipe builder), you can recreate this template. Before trying to build this in your ESP, I recommend watching all of the videos in the rest of this post first, so that you’ll have an understanding of which options fit your purposes.
If your ESP doesn’t offer an automations builder, check the settings for your sign-up form to see if you are able to send a multiple-email series after someone signs up. If this isn’t allowed, I highly recommend switching email service providers. [Full Disclosure: As an affiliate, we receive compensation if you purchase through this link.]
Getting Subscribers into Your Welcome Sequence
With the ConvertKit template we are using, there are three ways to get a subscriber in to your evergreen email sequence:
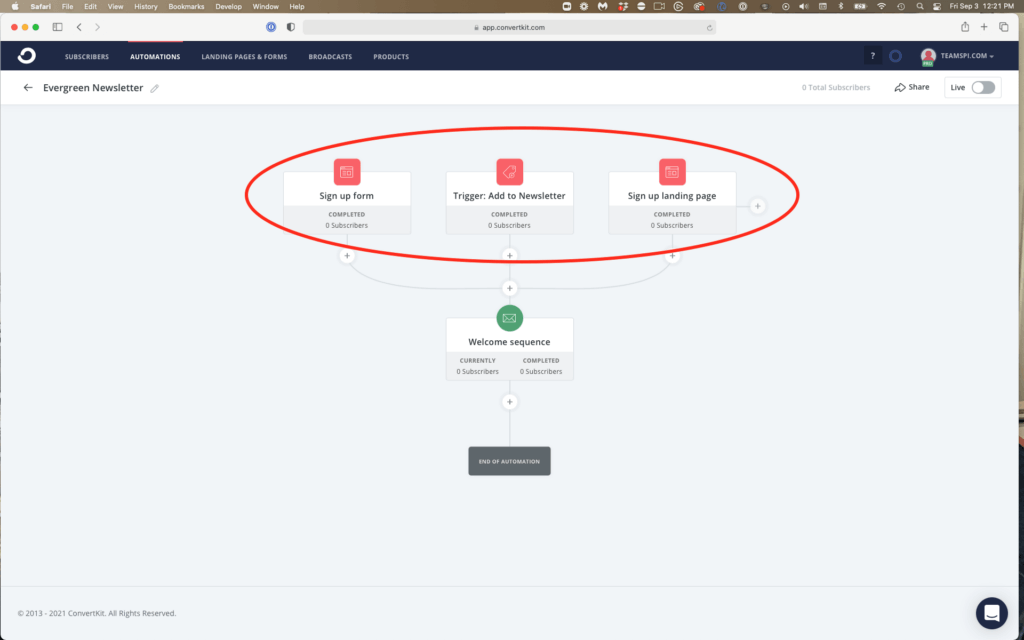
- A sign-up form
- A tag
- A sign-up landing page
There’s an interesting nuance with Welcome sequences versus any other type of evergreen email sequence, and that is that a Welcome sequence is the very first batch of emails that you are sending after someone joins your email list. Because these are the first emails you’re sending, you are unlikely to use a tag as a method of getting subscribers into your sequence.
If you are interested in the reasons behind this, I go into a lot more detail in this video. If the email sequence you’re setting up is not designed to be your subscriber’s first emails from you, then using a tag (or “link” trigger) may be relevant. See that video to learn how to use tags for this purpose.
With that in mind, you can delete the tag from this automation.
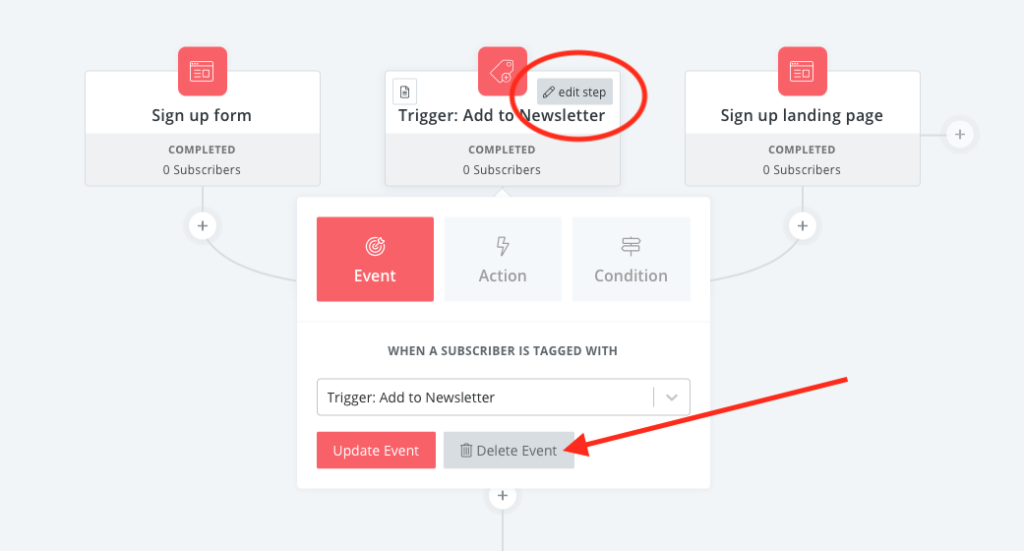
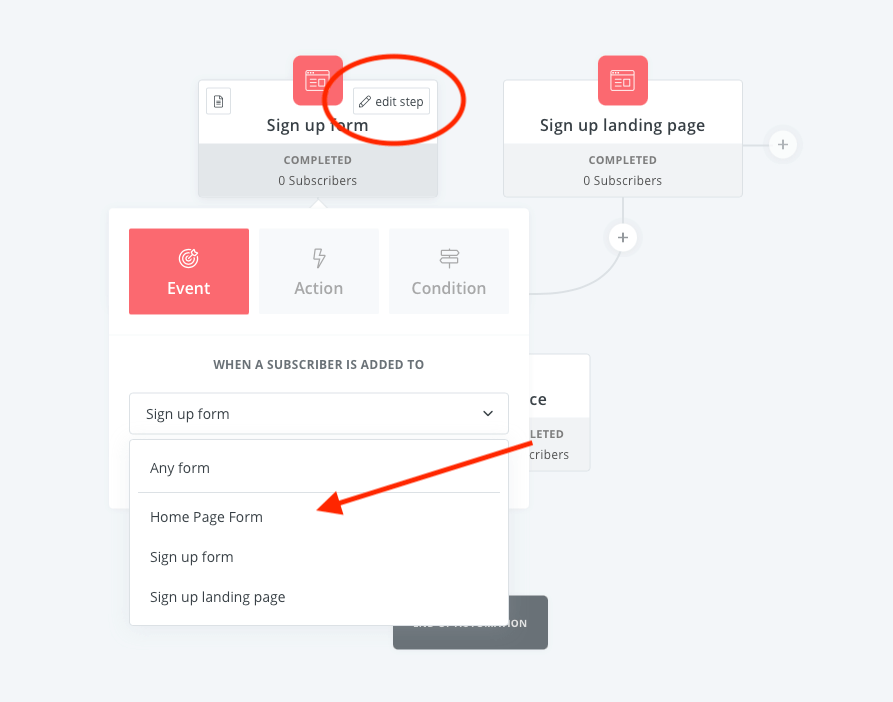
- First, hover over the Trigger: Add to Newsletter item.
- You should see the Edit Step button appear (red circle in the screenshot). Click on it.
- In the editor, click on Delete Event (red arrow in the screenshot).
This leaves us with opt-in forms and landing pages as the two methods to get subscribers into our sequence.
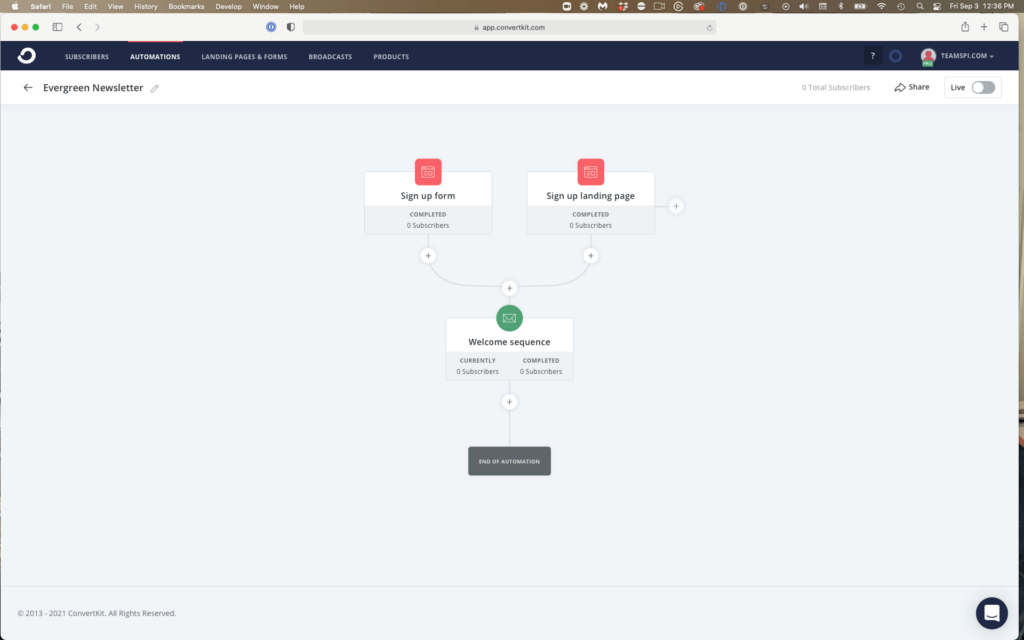
Let’s talk about how to use each of them to get people to sign up for your email list so they can start receiving your welcome emails, and if you should use both methods or just one.
Customizing an Opt-In Form
At SPI, opt-in forms are our preferred method for collecting email addresses. These are small forms designed to collect first name and email address, along with any other custom fields you may choose to add. (No need to overthink it; we usually keep it to just those two.) ConvertKit gives you code so that you can embed the form into your existing website—anywhere that accepts HTML. At SPI, we use the forms on our own website, as well on our Teachable website. In the past, we’ve used them on Leadpages and other single-purpose landing pages as well.
I like using forms because I can easily drop them into my existing content. Depending on the template I choose, I can make them blend into the existing design or get them to stand out based on my specific needs at the time.
If you’ve been using ConvertKit for a while, you probably already have at least one email opt-in form set up. If so, there’s no need to build a new form just for this automation. Instead, you can update the automation to replace ConvertKit’s placeholder opt-in form with one of your choosing.
- First, hover over the Sign up form item.
- You should see the Edit Step button appear (red circle in the screenshot). Click on it.
- In the editor, click on drop-down box and choose your existing form (red arrow in the screenshot).
- Click Update Event to save your change.
If you are new to forms, this video walks you through the process of styling your form—and I show you how to deal with a styling problem that can crop up when using ConvertKit’s automation templates.
Once you have your form built, you need to configure your settings.
Customizing a Landing Page
A landing page is a good choice when you need a single, standalone page for your project. Maybe your website isn’t ready yet, but you want to start building up an email list before the launch—this is a great time to use one of ConvertKit’s landing pages.
Another great use for these pages is to test the market—perhaps you have an idea for a new product and you want to see if anyone in your audience is interested in it. With one of ConvertKit’s landing page templates, you can quickly put together an interest form, without having to spend a lot of time stuck in web design.
Watch this video to learn more about customizing landing pages.
Now that you’ve configured your automation entry points, you can delete any that you have chosen not to use. If I were using this automation template, I would keep Sign up form and delete both the Tag and the Sign up landing page. To delete:
- Hover over the item and the Edit Step button will appear. Click it.
- Click on Delete Event.
Let’s move on to the fun part—writing and configuring your welcome email sequence!
How to Build Your Welcome Sequence (and What to Include)
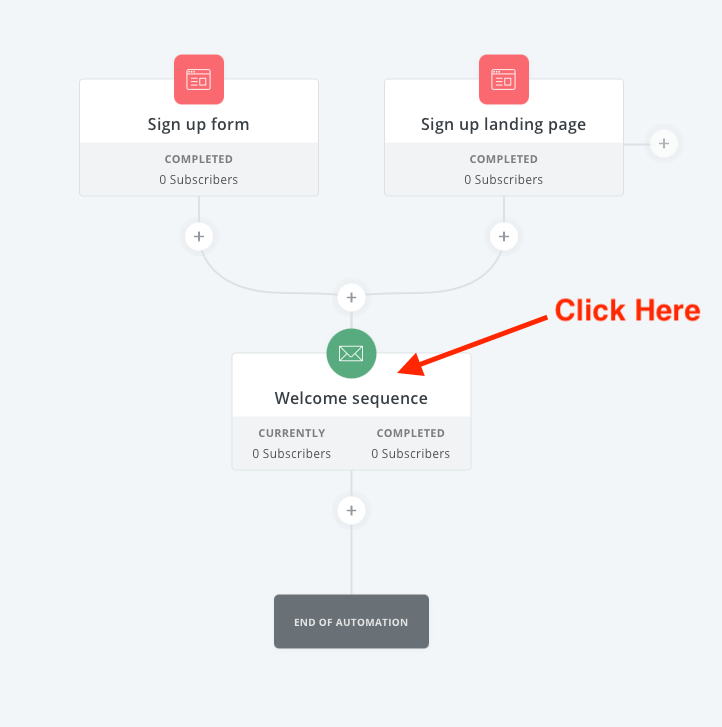
The first thing you need to do is access the ConvertKit sequence editor by clicking on the email sequence.
Okay, now you’re in. So what do you write about? That’s what we’ll tackle next.
There are three common questions people have about their welcome email sequence:
- How many emails do I need?
- How often should I send emails?
- What should I write about?
The first two questions are kind of linked. You want to send people emails often enough that they remember you, but not so often that they are annoyed by you and unsubscribe (or worse, report your emails as spam).
And that balance can be a little hard to strike. I would suggest that initially you send a few emails right away, in the first week after they subscribe. This helps them remember who you are. After that, you may want to slow down the pacing of your emails to once or twice a week.
You’ll need to experiment a little, though, and over time, you’ll learn what works best for you and your audience.
Related: AP 0949: How Do I Evaluate Email Success with ConvertKit?
You can of course use ConvertKit to automate your email welcome sequence based on your chosen timing. Check out the rest of the video to learn how to use ConvertKit editor to build your welcome email sequence and set the pacing of your emails.
This brings us to the final (and maybe most important) question: What should I write about? As you saw, ConvertKit offers some helpful advice on what to write about in your first few emails when you first opened the editor.
But what if you’re looking for more guidance?
Thankfully, we’ve got a great free resource for that: the Email Marketing Cheat Sheet. The cheat sheet gives you a framework for writing your emails so that they can both help your audience and assist you in achieving your goals for that email, whether it’s to teach your audience who you are, to learn more about your audience so that you can serve them better in the future, or to introduce them to a product or resource that you have available for them.
The email marketing cheat sheet shows you 10 different types of emails you can include in your welcome sequence. You can grab it below.

Download the FREE Email Marketing Cheat Sheet
You have your email list set up, but what should your emails say? The Email Marketing Cheat Sheet teaches you exactly what to send to your list, including 10 cut-and-paste-templates for the different types of emails your audience will look forward to.
A Free Training to Help Make Your Email Marketing Easy
By the way, if you’re trying to make your email marketing a little easier, then check out the free 1-hour training we’re hosting this Thursday, September 9th at noon Pacific. It’s both for beginners who have a small or no email list, and those who have started but are overwhelmed—or bored!—with email marketing.
You’ll learn:
- Two powerful strategies to kickstart the rapid growth of your email list.
- Two little known ways to use your email list (because it’s not just about growing your list).
- The email sequence Pat uses for launching for new products.
- How to use email marketing to automate your business.
And finally, don’t forget to subscribe to the SPI Media YouTube channel!
 Ray Sylvester
 Pat Flynn