Editor’s Note: Since the writing of this post, Pat has switched email service providers from Aweber to ConvertKit. To learn more about ConvertKit, click here. [Full Disclosure: Pat is a compensated advisor and an affiliate for ConvertKit.]
This is a step-by-step tutorial that will help you configure your Google Analytics account so that you can track email conversions.
Why would you want to do this?
Because once you set this up you can quickly (in seconds) see how many people are subscribing to your email list, where they are coming from and the conversion rates for each of those pages.
This data is extremely important to know because then you can see what’s working, what’s not working, and then act accordingly.
(And if you have yet to start building an email list, here’s a beginner’s guide to help you get started.)
Yes—you can get this data in the backend of most email marketing service providers, however it’s not easily accessible.
For example, here’s a snapshot of my email list information in Google Analytics from the past month:
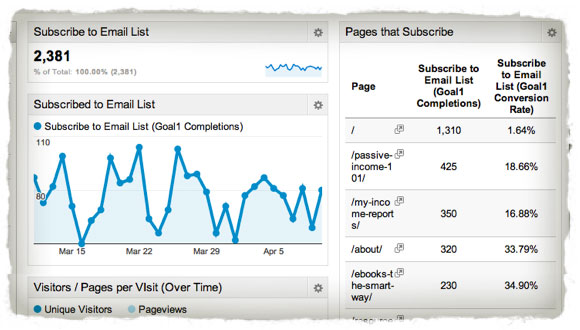
I can quickly see that I’ve accumulated 2,381 subscribers (between 50 and 110 subscribers per day) and the pages with the most subscriptions are my home page, my getting started page, my income reports page and my about page, and the pages with the highest conversion rates are my ebook landing page and my about page.
By the way, have you put an opt-in form on your about page yet?
From here, I can test different strategies and see how they affect my conversion rates, or find a particular date where email subscriptions were abnormally high (or low) and further investigate.
Let’s get started…
How to Setup Email Conversion Tracking in Google Analytics
Approximate time to complete: Less than one hour
Step 1: Create a “Confirmation Thank You Page”
A confirmation thank you page is a page on your own website that people who confirm their subscription to your email list are redirected to.
This is absolutely necessary because Google Analytics only knows when a person has subscribed to your list when they arrive on this page. At that point, the tool can pull data from that specific visitor as far as how they got there.
Sidebar: So what kinds of things should you include on your thank you page?
Here’s what I have:
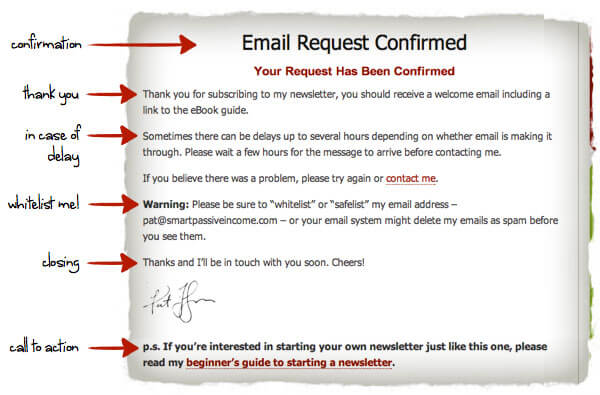
Definitely use this opportunity to include a ‘call to action’ like I did above (thanks to Blog Tyrant, for the tip), because the subscriber has just completed 4 or 5 steps to get to that point, so they’re considered ‘hot’.
Lot’s of marketers will tell you to directly sell something on this page, and that may work for some niches and industries, however I like to include a relevant link that could, down the road, lead to some kind of transaction.
For example, my call to action is:
If you’re interested in starting your own newsletter just like this one, please read my beginner’s guide to starting a newsletter.
And of course, that’s pillar content with lots of social proof (120+ comments) and a few affiliate links to Aweber sprinkled throughout.
So—setup your confirmation thank you page and remember the URL, you’re going to need that in a couple of steps below.
Step 2: Connect your “Confirmation Thank You Page” to your email list.
In this step, we’re going to tell our email marketing service what URL they should redirect confirmed subscribers to.
In Aweber, you can enter the confirmation thank you URL by following the path marked below:
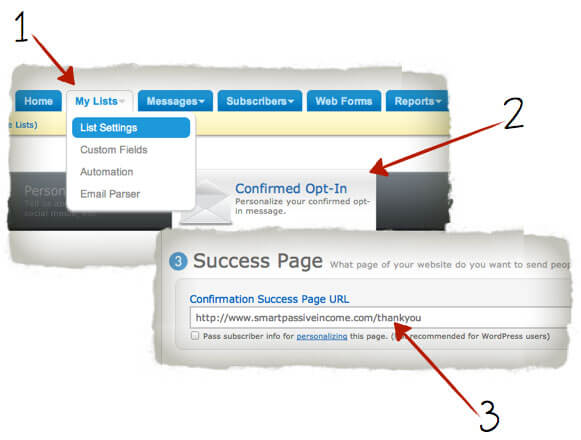
If you’re using Mailchimp, click here.
If you’re using anything else, look for something that says “confirmation thank you page” in the knowledge base.
At this point, we’re ready for Google Analytics.
Step 3: Sign in to Google Analytics
Make sure you’re using the New Version interface, and open up the account/report for the page you want to track. Typically, you’ll start on the “Standard Reporting” page—so let’s take it from there.
Step 4: Click on Admin in the Upper-Right Hand Corner

Step 5: Under the “Profiles” Tab, Click on Goals and then on any open +Goal

Step 6: Configure Your Goal
- Name your goal. For example: “Subscribe to Email List”
- Set Goal Type to URL Destination (this will open up Step 7)

Step 7: Insert Goal URL
- When inserting the URL, just use the part after your root domain. So for example, if my thank you page is at https://www.smartpassiveincome.com/thankyou, then I would use: /thankyou
- It doesn’t matter too much here, but you can use head match just to be safe.

Thanks to Matt Fox from Persuasion Theory for even more tips about this step in his comment here.
Step 8: Save
At this point, we’re done setting up our goal.
In fact, you can use this same method to track other things, such as product sales, or any other sort of funnels you want to create and track—as long as you have a particular “end point” (like our thank you page) that you can insert into the Goal URL destination.
You also have the option, within each particular goal, to create a funnel sequence (page 1, page 2, page 3… goal url) to see how far people get along in a particular process and where they tend to drop off before reaching the goal url.
Very powerful stuff.
Let’s finish up by creating widgets on a custom dashboard.
Step 9: Click on “Home” in the the Navigation Menu
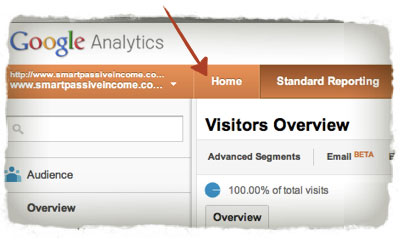
At this point, you’ll see a default dashboard that will show you things like daily visits, average time on site, traffic types, etc. You can choose to add the email tracking widgets here if you like, but to keep things separate and clean I’ll be creating a new blank dashboard.
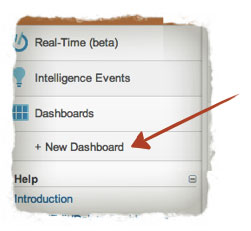
Step 10: Expand “Dashboards” On the Left-hand Menu and Click on “+ New Dashboard”
Step 11: Select “Blank Canvas”and Name Your New Dashboard
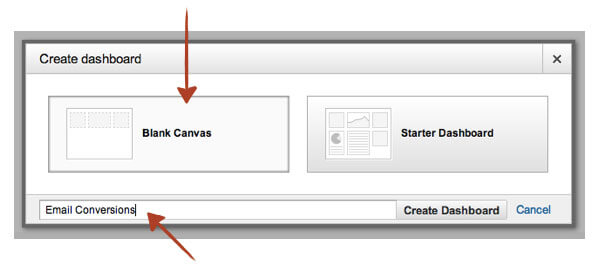
After you click Create Dashboard you’ll be prompted with a “Widget Settings” screen, which is a fancy tool you can use to create any sort of customizable tracking data you want and place it on your dashboard for easy viewing.
The problem is, it’s a little clunky and hard to understand at first.
Just follow the steps below to get the more important pieces of information you need up and running on your new dashboard.
Step 12: Add a Metric Widget to Track Total Email Subscriptions
Select the METRIC widget and in the drop-down menu under “Show the following metric”, add metric:
- Subscribe to Email List (Goal 1 Completions)
(the selection has the same name as the name you gave your goal in step 6)
Then, title this widget (i.e. Total Email Subscribers), and click SAVE.
You should then see a new box on your dashboard that shows the number of people who have signed up to your email list since you started tracking—zero.
And remember, once you start accumulating subscribers from this point forward, the number in this box (and all of the other information shown on this dashboard) are within the date range selected at the top of Google Analytics.

Step 13: Click on “+Add Widget” and Add a Timeline Widget to Track Daily Email Subscriptions
Select the TIMELINE widget and in the drop-down menu under “Graph the following metric over time:”, add metric:
- Subscribe to Email List (Goal 1 Completions)
Title this widget (i.e. Daily Email Subscribers), and click SAVE.

Step 14: Click on “+Add Widget” and Add a Table Widget to Track Your Top Performing Pages
Select the TABLE widget and in the drop-down menu under “Display the following columns:”, add dimension:
- Page
To the right of “Page” add metrics:
- Subscribe to Email List (Goal 1 Completions)
- Subscribe to Email List (Goal 1 Conversion Rate)
Show a table with 10 rows so you can see the maximum pages. Title the widget (i.e. Subscription Path), and click SAVE.

And we’re done!
Don’t freak out if your dashboard looks a little something like this:
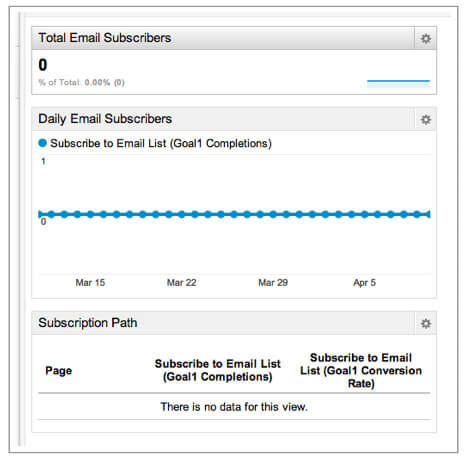
Even within the next day or two you’ll start to see data come in about your subscribers that you can use to analyze how your site is performing and what you could do to improve.
Just click on the Home button every time you login to quickly and easily check the performance of your email subscriptions and conversion rates.
I hope you enjoyed this tutorial.
Cheers!

