Pat Flynn
Lately, I’ve been experimenting with a number of various blogging strategies to find those little things that are yielding big results, and I wanted to share those little things that are working for me with you today.
These tips should take you less than 5 minutes to implement, and although they may seem small, they pack a huge punch.
Let’s get right to it…
1. The “Little Extra Thing That You Can’t Miss” Headline
I’ve only recently started experimenting with this tactic on my own websites (like in the title of this post), but I’ve been working with a student and the results of this strategy are blowing my mind.
This started when I began to notice “a little something extra” in the titles of blog posts on popular sites like BuzzFeed and ViralNova:
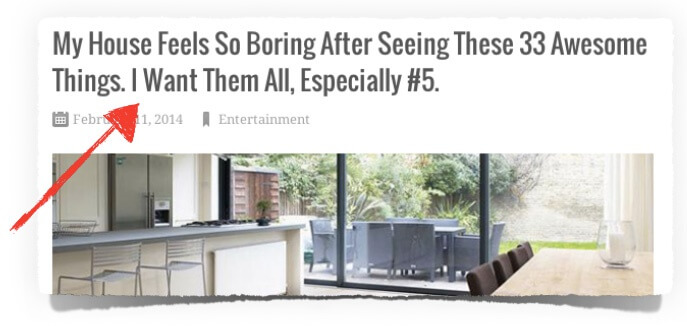
The “I Want Them All, Especially #5” is the something extra, and it seems to be pulling in a ton of extra traffic and shares.
When you read that title, how can you not wonder what #5 is?
Is it worth cluttering up your title for something like this? Well, this strategy doesn’t work for all types of blog posts and it also depends on your audience—but today more than ever, encouraging action and social sharing seems to be taking priority over SEO specific blog post titles.
It’s definitely something worth experimenting with, especially considering that you could have the best content in the world within your post, but if your headline isn’t good enough to get people to read the first sentence, your content may as well not even exist.
2. Start with a Story
I’ve been keeping track over the past 8 months of blog posts that I write which start with a story, and blog posts that I write which do not start with a story.
Unfortunately, there are way too many variables to make any hardcore conclusions about which is better (for example: the topic of the post, the headline, where traffic is coming from, what else is written in the post), but my analytics do paint a little bit of a picture for me.
On blog posts where I do start with a story, the bounce rate (according to Clicky’s definition, which is a user who only visits one single page and leaves within 30 seconds) is significantly less. [Full Disclosure: As an affiliate, I receive compensation if you purchase through this link.]
Again, there are a lot of variables involved, but even so, this makes complete sense.
We love stories. We can’t help but finish a story that we’ve started, so when you start your post with a story, people are likely to continue reading, and the further down the page they go, the more likely they are to keep going.
Of course, your story should be relevant to the message and transformation you’re trying to get across to your audience, but the point is, if you want to hook ’em right from the start, try starting with a story.
3. Check Analytics. Add Opt-in Forms. Enjoy a bigger list.
This strategy only takes a few minutes, yet hardly anyone follows through with it.
Here’s the step-by-step:
Log into your analytics account and find the 5 most viewed pieces of content on your site over the past 2 months.
Add opt-in forms for your email list on those pages or posts.
Done.
When I learned that I had a ton of traffic visiting my About Page (and actually, it was Derek Halpern in this public video that pointed it out to me), I immediately added opt-in forms to the page, and after a month I experienced a 446% increase in opt-in conversions on that specific page.
This is why I also include an opt-in form on my Income Reports page, because it’s one of the most heavily visited pages on the site too.
Whether it’s a post or a page, it doesn’t matter. Where ever most people end up on your site, that’s where you want to put an opt-in form.
If you have yet to start an email list, then this tip isn’t any good for you right now, but it’s something to keep in mind for later—hopefully sooner than later.
Just in case you need it, below is a link to my tutorial for starting an email list and newsletter:
Click here for my Beginner’s Guide to Starting a Newsletter.
4. Isolate Super Important Links
Did you notice how I linked to my newsletter tutorial above?
The link is isolated on its own line, and it takes up the entire line too.
That link is an important link within this post, one that can help a lot of people, but also one that, as a by-product of providing value, can potentially lead to an affiliate commission because of a product that I recommend within that post.
I’m giving this link the best chance possible to be clicked on by isolating it the way you see it there.
How so?
The truth is, we cannot control the device people use to consume our content. A computer, a laptop or mobile device—that’s not up to us, it’s up to our audience.
This is something I learned about while attending an eye-opening presentation by Greg Hickman from MobileMixed.com last month at New Media Expo where he talked about optimizing our content for the ever-growing mob of mobile users we have coming to our websites.
Last month, for example, 20.2% of the unique visitors to Smart Passive Income were people on mobile devices. That was a record, and that number will continue to climb.
So how does an isolated link help?
Have you ever tried using your finger to tap on a link on a mobile device, and clicked the wrong link instead?
It happens to most of us, because most websites are not mobile optimized.
If you don’t have a phone, or never mis-tapped before, good for you, but that doesn’t matter. We’re talking about your audience, and they are coming via mobile, and they will “fat-finger” your links if you don’t think about it.
If you’ve ever received any of my emails, you’ll notice that I use the same isolation technique in my copy, and in an email, it’s probably more important to isolate links than within a blog post.
According to Greg, 51% of all email opens happen on a mobile device.
51%!
So you’d better make that link as easy to click as possible on in your emails if you want to get the most out of it.
Also keep in mind that a number of your subscribers could be getting your blog posts via email as well—not just your newsletter and broadcast emails, which is another reason to use this strategy in your blog posts.
It only takes a few seconds to implement, but isolating your important links can mean the difference between someone easily clicking through and going to where they need to go, or someone not finding their way around or getting frustrated and leaving for good.
5. After You Hit Publish, This Step Should Be Next
For the longest time, I would blog until I hit the publish button. Once I hit that button and confirmed that the post I just wrote was up on my website, I considered myself done until it was time to start the next post.
Now I know that writing a post is just half the battle, and hitting the publish button is actually just the beginning of what blogging really is all about.
Blogging isn’t just about publishing content, it’s also about marketing that content and getting it out into the world for people to read, share and take action.
There are, of course, several different ways to market a blog post, and we all seem to understand the importance of sharing our posts on Facebook and Twitter and other social media channels where our audience resides—but even before doing that, there’s one step in between that you should implement that will help get your content in front of more people who have yet to discover you.
I learned this strategy directly from Gary Vaynerchuk who told me live on this podcast interview that I could get so much more leverage out of sharing my posts and podcasts on Facebook if I took a little bit of extra time to create an image with some text and my logo on top of it, and then and only then I should share it on Facebook and other social media platforms.
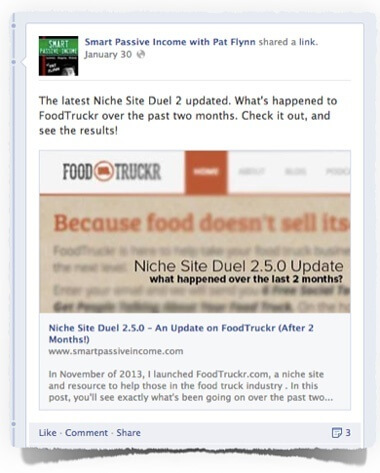
Since that interview, I’ve been taking a little bit of extra time to create graphics just like Gary described, and the results have been amazing! If you’re on my Facebook page, you would have noticed a number of images that look similar to this:
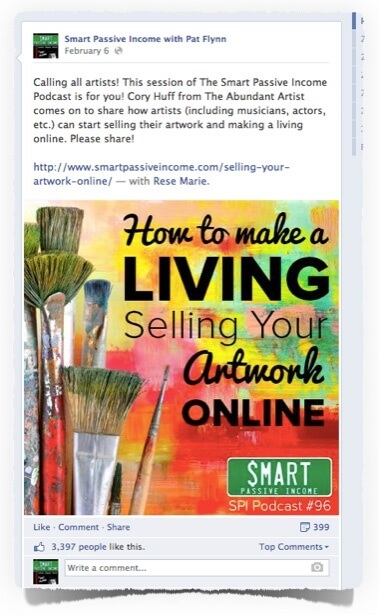
In the noisy world of social media, graphics like this are more likely to be seen and shared, and since starting this strategy and adding it to my pipeline, Facebook has become the #1 referring website for Smart Passive Income.
If you have a VA or graphic designer on your team with the capability to create images like this, then of course you’d want to outsource this task to them.
But if you don’t have one, or prefer to do these yourself (which is what I do) it’ll take some time to learn how to do it quickly.
At first, it took me 15-20 minutes to complete an image, but now I’m at a point where it’s taking less than 5—but even if it took 30 minutes, it would still be worth the effort.
If you’re not creating graphics like this, you’re doing yourself, your content, and your audience a total disservice.
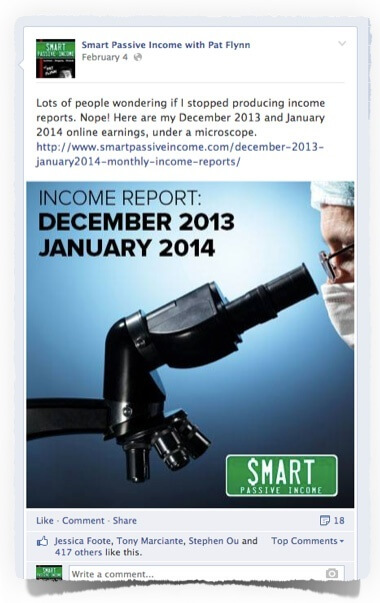
The graphic and the text doesn’t have to be very fancy either. Here’s another post I just recently published with some very simple text, but the same kind of results:
Below is a link to a blog post I wrote that will help you find images that you’re allowed to use for this type of situation:
The Ultimate Guide to Finding and Using Images on Your Blog
If you’re not into stock images or creative commons and don’t want to waste time finding images on your own, then you can take a screenshot of your own content or website, blur it out and then add text on top of that image instead, like this:
As far as tools to create these images, I use Adobe Photoshop, but you could also use Gimp, Paint.net (windows only), or Pixlr.
And since publishing this post, many commenters have suggested PicMonkey and Canva too!
Actually, here’s a post of 10 photoshop alternatives that are completely free to use.
There’s also a free tool I just found called Fotor, which has a tool specifically used for adding text onto images. If you’d like to upload your own images to Fotor, click on the “add photos” button on the right hand side. It took me a while to find this function.
And lastly, let’s quickly go over the size of the images and the process of uploading them to Facebook.
I typically create an image that is 403×403 pixels square, knowing that the image will not be cropped or cut off when it appears in people’s feeds. I upload the image first, and then add in my status update and link to my content from there.
According to Amy Porterfield, however, Facebook recently made a change giving preference to link-share posts. These types of posts actually show up more often in people’s feeds, and they use a different image size too.
When you paste a link directly into your Facebook status area first, you’ll see some content automatically populate, including the title of your post, a description of it (which you can edit), and a spot for an image that is more rectangular in size. You can click through and select an image that’s already in your post, or you can upload your own. This is where you’d upload a unique image with some text perfectly suited for your Facebook fans, if you don’t have one in your post already.
The size of this image should be 560 pixels wide by 292 pixels tall.
They are weird images sizes, for sure, but I hope this helps you figure this out a little better. Now that I’ve been doing this religiously after each post and podcast episode, the process is getting much quicker, and the results are definitely there.
To Finish Up…
With the exception of the last tip if you’re not familiar with image editing (which makes me feel like a video tutorial on how to quickly add text to images would be very useful—please confirm in the comment section below if you’d like to see that), all of these tips don’t take very much time to implement, but they can yield big results in your blog and online business.
I hope you implement at least one of these strategies, and if you’d like to add anything, or suggest a “5-minute or less” tip of your own, I’m sure the community would be very thankful! Just add that into the comment section below.
If you’ve found value in this post, please click one of the buttons below to share it! Thanks so much, and here’s to you and your blogging success!
Cheers! 🙂