Take it from me: Webinars are one of the most powerful ways to build relationships with your audience and grow your business. And in this definitive webinar how-to guide, we’ll take you through all the steps you need to follow to succeed with your very own webinars.
But first, what exactly is a webinar—and why would you want to use one?
What Is a Webinar and Why Should We Use Them?
A webinar (derived from “web seminar”) is a content format that allows you to connect with your audience over video, usually live, to educate them about a specific topic. An effective webinar provides a moment in time when people can hear from you, in a focused way, and leave with some new knowledge and inspiration to grow or create something of their own.
The business of webinars is booming! I’ve been hosting my own webinars consistently for the last four years. I’ve done over a hundred of them, and I’ve been a guest on other people’s webinars too.
I’ve also attended my fair share of webinars. When you’re logged in and waiting for the presenter, there’s a special anticipation and excitement that you don’t get when you’re just watching a prerecorded YouTube video. It’s almost like the feeling you get before someone goes on stage at a concert. It’s an event!
Here’s the thing, though. With so many people doing webinars these days, some of those webinars are great, while others—well, let’s just say their creators should have read this guide first. It’s designed to help you cut through the clutter and make it simple to create and run your own successful webinars.
What Webinars Can Do for You
Online business owners use webinars in a number of ways. Webinars are typically used to teach and inspire, and sometimes to sell. A webinar gives you a chance to:
- Build your audience and engage with them
- Teach your audience something
- Validate an idea for a product or service
- Make money through the webinar itself
I’ve used webinars to teach and provide value for free, build my email list, and promote and sell products like my courses—sometimes all in the same webinar. That’s part of the beauty of webinars: you don’t have to stick to one of these things. A single webinar can be used to teach, sell, and engage.
A webinar can also be used to collect feedback from your audience and validate an idea for a product or service you’re thinking of creating. And if you’re selling something, especially something that’s a little higher-ticket, a webinar can be a great way to make the sale thanks to the intimacy and real-time interaction they provide.
Webinars are simply a great way to build a relationship with your audience, because they allow you to teach and interact in an intimate, event-like environment.
What Does a Webinar Look Like?
A webinar usually consists of three main elements:
- You, the presenter (and any guest presenters)
- Your audience, joining via the internet
- Your presentation, which includes content such as slides and videos
People typically register ahead of time and join the webinar at a predetermined time. Most webinars include some combination of presenters talking on screen, sharing stories and information, plus other content like slide decks, videos, and images. Most webinar platforms also provide a way for the audience to interact by asking questions via chat.
One of the challenges and benefits of a webinar is that you have to actually get people to sign up to join. It’s a challenge because there’s the “friction” of getting them to sign up—but a benefit because it means they’re showing you they’re interested! Not all of the people who sign up will actually attend, but the ones who do attend will be there because they want to be.
And by the way, there will also be people who register and really want to be there but can’t because of scheduling issues or other reasons. You can send them a replay video of the webinar so they have a chance to see it, too.
Compare this to going live on a streaming platform, where anybody can tune in without registering (i.e., validating the topic of the event) and may or may not connect with your message.
In addition to fostering audience connection, webinars are a great way to connect with others in your industry. You can partner with fellow entrepreneurs by bringing them on your webinar and having them share their expertise directly with your audience. It’s like having a podcast guest plus the benefit of audience interaction in a live setting!
Where Webinars Can Go Wrong
With almost any popular technology or format, once marketers get a hold of it, things can go downhill. Unfortunately in a lot of industries, especially in the online business space, many people doing webinars aren’t taking care of their audiences or paying attention to how much value they’re offering.
You may have even joined a webinar you were initially excited about. You were drawn to the topic, and the promotional copy piqued your interest. Then you joined the webinar and had to sit through forty-five minutes of story with no added value. Oh, wait! Here’s the product pitch!
Doing a webinar this way can cause more harm than good—you might make a few sales, but a lot of people are going to feel like they gave you their time and didn’t get much in return. We’ll talk about this and other webinar mistakes you should avoid in the section Webinar Mistakes to Avoid.
Getting people to sign up and delivering an excellent experience are hugely important, but follow-up is also key. The opportunities to connect, share, and sell don’t end once the webinar does, and we’ll talk about the post-webinar process in the section How to Follow Up After Your Webinar.
Who Should Be Hosting Webinars—and Who Shouldn’t
The short answer is that webinars are for everyone (yes, even if you’re uncomfortable getting on camera!). When this guide was written, the COVID pandemic had resulted in a worldwide shift where people cut way back on travel and most in-person events were canceled or moved online. Webinars quickly became a crucial way to connect with audiences and provide event-like experiences in the absence of in-person meetups.
But is a webinar always your best option? Are there times you wouldn’t want to use one?
The simple answer here is that sometimes a webinar is more than you need.
If you’re thinking of using a webinar just to talk to your audience—and getting on camera is great for doing that—a webinar is probably overkill. You’re better off using a live streaming platform like YouTube, Facebook, or Instagram. That way, you can also take advantage of the algorithms on those platforms to expand your organic reach.
You also shouldn’t use a webinar if you’re just getting started and don’t have anything substantial to share with your audience yet.
A webinar can also be a lot to manage, in terms of the logistics and the technology involved—software and hardware—plus the fact that you’re doing it live. So if you’re not feeling ready for that, it might not be time for you to explore putting on your first webinar yet.
This Is Your Guide to Creating High-Impact Webinars
A lot of people are using webinars these days because they’re such a powerful format to teach and connect. The growth in webinars has led to new and excellent choices for webinar hosting platforms and software.
Webinars can be high-impact marketing and teaching tools—but they’re not easy to do well. Putting on your own webinar can seem daunting, but it can have a massive positive impact on your brand, your authority, and your online business success. That’s why we created this guide to make the whole process a little more digestible and put you on the path to success with your first webinar.
A webinar should be valuable to your listeners, so to create and host a successful one, you need to tap into the perspective of your potential attendees to come up with an experience they’ll flock to. That’s the first and biggest lesson we’ll help you learn and put into practice in this guide. We’ll show you how to create a great webinar, from structuring it to promoting it, conducting it, choosing the right software and hardware, knowing how to follow up, and avoiding common mistakes and pitfalls. You’ll learn how to get engaged audience members to register and show up to your high-quality event, and what to do afterward so you can keep the momentum going.
Here’s what to expect in the SPI Guide to Winning Webinars:
- What Goes Into a Great Webinar?
- How to Choose a Webinar Topic That Works
- What’s the Best Webinar Software?
- Which Equipment Do I Need to Run a Successful Webinar?
- Webinar Marketing: How to Get People to Show Up to Your Webinar
- How to Host a Highly Engaging Webinar
- How to Sell a Product on Your Webinar (without Annoying Your Audience)
- How to Follow Up After Your Webinar
- Webinar Mistakes to Avoid
If you haven’t been injecting webinars into your business, give it a shot! I won’t lie—it takes some courage and the willingness to get uncomfortable. After all, a webinar is a live event! It’s a lot, but we’re here to make it easy for you, so let’s get started learning about what goes into a successful webinar.

Learn how to prepare for the perfect webinar.
Planning a webinar doesn’t have to be hard. Our free cheat sheet will walk you, step by step, through everything you need to prepare for the perfect webinar.
What Goes Into a Great Webinar?
A webinar is a chance to get direct access to your audience—including people who don’t know you well yet—so it’s a great opportunity to build lasting relationships. Relationship building is something you shouldn’t take lightly, so it’s crucial to create a great experience for your webinar attendees.
Here’s the first thing to know as you’re planning your first webinar: A great webinar is not just the hour or two you spend in a virtual space with a group of people who are paying close attention to you. A great webinar actually has three components:
- pre-webinar
- the webinar itself
- post-webinar
In the pre-webinar phase, a great webinar is one that people are excited to sign up for, that builds anticipation, that has people immediately putting it in their calendar because it’s something they don’t want to miss. During the webinar, the host creates an engaging atmosphere where people feel excited to listen, learn, and contribute—and to follow through on what they’ve learned after the webinar. Finally, what happens post-webinar is arguably as important as what happens before and during, because it’s when you keep the conversation going and continue fostering relationships with your audience.
Whether you choose to use your website to build your list, sell a product or create a stronger connection with your audience (or all of the above!), let’s dive into the three parts of a great webinar, and how to master each one.
Pre-Webinar
Creating and hosting a great webinar starts way before you log in and share your screen with everyone.
Picking a Topic
The first step in creating a great webinar is picking a great topic.
When you’re picking your topic, you first need to understand who your audience is and what their goals and pain points are. You then want to find out how you can provide value and teach them something that will help them reach those goals and remove those pain points.
All of the webinars I conduct revolve around topics that my audience is interested in and wants to learn more about. In session 521 of the AskPat podcast, I help Venisha come up with an idea for a webinar topic that works for her business goals. Spoiler alert: I encourage her to think outside the box a little bit.
Designing the Webinar
Once you’ve chosen your topic, you need to design your webinar. We’ll talk more about the structure of a great webinar in in the section How to Host a Highly Engaging Webinar, but there are a few guidelines and pieces that will go a long way toward creating a memorable experience.
Great webinars include a mixture of storytelling and teaching. You may choose to use slides to illustrate your points, but your webinar should also include moments where you’re face to face with the audience. You can use “pattern interrupts” to break up the monotony and keep people engaged. As for your slides, all the rules for creating a great presentation apply. Not too much text, and mix it up with images, even animated GIFs and videos.
The best webinars teach what they need to, without extra fluff. Stories can be added for flavor, but when the story crowds out the learning, your audience’s experience will suffer.
With that in mind, how long should your webinar be? The typical length of a webinar is anywhere between thirty minutes and up to two or even two and a half hours on the higher end. It depends on the topic. However long your webinar is, it’s really important to honor people’s time and not go over the scheduled time.
During the webinar, it is valuable to share testimonials and success stories of people who have taken the actions you’re suggesting.
A great webinar experience can also include co-hosts or guests. I’ve been on a lot of webinars as the featured teacher or guest, and it’s always a great experience.
Another powerful thing to do on your webinar is provide a small, quick win for your audience. If you want to give people a ton of value, you need to show, not tell them. This means suggesting an action people can take that will produce a positive result in a short time—and if it’s something they can do during the actual webinar, even better!
What about if you’re selling something on your webinar, like a course or training program? Regardless of your goals with your webinar, you always want to lead with education and giving people something valuable to take away. This also lets you prove your expertise and showcase your teaching style.
We’ll talk a lot more about selling on your webinar in the section How to Sell a Product on Your Webinar, but there’s a general rule I learned way back in 2010 from Lewis Howes that still holds true for any webinar, and that’s “95 percent content, 5 percent offering.”
Registration
Next, you need to have a great registration process. You want to create a registration landing page with more information that sells the benefits of signing up and joining the webinar. People aren’t going to just give you their time—you have to earn it—and the information on this page will help you convince them it’s worth your time. This landing page should create excitement and speak to the problems or the pains of your target audience. Think about promoting your webinar like you’re selling a product, with testimonials, what to expect, and what the outcomes will be. You should also share that the webinar will be an opportunity for direct access to you and a chance for people to get their questions answered.
Webinar Marketing is where we’ll talk more about how to market your webinar to get more people to register—and of course, show up.
Speaking of showing up, once someone is signed up, you need to have a system in place for communicating with them, at minimum through a series of automatic reminders. Email is typically the best way to do this. Once a person registers, they will get sent reminder emails with links to make it easy for them to join; as we’ll see in Webinar Marketing, some software can do this for you.
Once people register, you may even want to give them some “homework” to do beforehand to get them excited. For example, if you’re hosting a webinar about starting a podcast, you can have people start thinking about the name of their show. This will get them excited about joining the webinar and putting their show name into action and actually turning it into something in the future.
Last but not least, practice! As the date of the webinar approaches, make sure you have practiced your presentation at least two or three times. Know your material so you don’t have to read directly from a script when it’s live. It’s okay to have notes, but if it sounds like you’re just reading, people are going to tune out. You also want to do a test run with everything set up the way it will be during the actual webinar (what they call a “tech rehearsal” in theatre). Make sure you have everything you need and that it’s working properly. We’ll go over the details of what you’ll need for equipment and software later in this guide.
During the Webinar
Right before the webinar: Log into your webinar platform at least fifteen minutes early to make sure everything is working, and connect with your co-host or guest before broadcasting live if need be. This also gives you a chance to make sure all the tech stuff is working perfectly before you let the main audience in.
Then, you can go live a bit early to welcome people and say hello before the “official” start. As people join, say people’s names, remind them they’re in the right place, and get them excited for the start of the show.
During the webinar, a great webinar host helps people get comfortable and feel like it’s going to be worth their time. You want to continually engage with people and make them feel like part of the event.
It goes without saying that you should introduce yourself, especially for people who may not know you. A great host gives people a glimpse of who they are and why people should listen to them, but doesn’t spend too long with their own backstory. After all, people are ultimately there for the content.
Then go over the logistical details of how the webinar will go and how the software works, as well as when and how to ask questions. Explain how long the webinar is going to be and what people will get out of it. This last point is crucial: You need to give attendees a clear idea of what they’re going to learn and what transformation they’re going to achieve by the end.
It can be smart to pose an open-ended question early on that you will plan to answer at the end of the webinar. This creates an “open loop” that will keep people curious and engaged throughout.
Throughout the webinar, thank people for joining and staying with you and encourage them to participate. When they do participate, such as by asking questions in the chat window, make sure to mention their names as you engage with them. Also, you probably won’t be able to answer every single question yourself, so it may help to have another person in there to filter them for you.
Some webinar tools, like Demio, even let you run polls and share those results in real time, which is another great way to get your audience involved.
These are just a few tips for creating an engaging webinar—a topic we’ll dive into in more depth in the How to Host a Highly Engaging Webinar section.
Post-Webinar: Wrapping Things Up and Beyond
A great webinar ends on a high note and with a call to action. But the work doesn’t end there. You need to follow up with everyone who registered, whether they attended or not. At minimum, send everyone a copy of the recording so they can view it at their convenience. (I recommend hosting it on a permanent landing page on your website.)
And if you sold something on the webinar, then your sales process doesn’t end when the webinar does. If you shared an offer or call-to-action during the webinar, you can and should share it again. We’ll go over that and other elements of webinar follow-up—including how you should reach out to people who didn’t even register for your webinar—in the section How to Follow Up After Your Webinar.
A Webinar Is More Than a Presentation
I have one more tip to help you learn how to make a great webinar: Join other people’s webinars to learn what to do and not to do. See what you like and what you don’t, what works well and what doesn’t.
Your webinar can and should be so much more than just a presentation. You can make it something that people will thank you for, watch again, and share far and wide. A great webinar is one that overdelivers and gets people excited about taking action and sharing what they’ve learned.
All right, let’s help you pick an awesome topic for your webinar!
How to Choose a Webinar Topic That Works
The beauty of creating your own webinar is that it can be about anything! And the downside of creating your own webinar… is that it can be about anything!
Choosing a Great Webinar Topic Is All About Validation
Thankfully, creating and delivering your own webinar includes a built-in mechanism to learn if your topic is a good one or not, and that’s the point when you ask people to register. If your webinar is getting a ton of registrations, that’s pretty good validation that you’ve chosen a great topic. And if signups are few and far between, that’s a good indication that you chose your topic poorly.
So does this mean you should just pick a topic you think will make a good webinar, create a landing page, and wait to see how many people sign up? Although you could, I don’t think it’s the best strategy because you could easily spend a lot of time just to find out nobody wants to show up.
That’s why I recommend doing work upfront to understand the topics and concerns your target audience might have, so you can create a webinar that addresses those subjects.
Because remember, when you invite people to a webinar, you’re asking them for something special: their time. And if your topic isn’t interesting enough to inspire them to trade their time to learn about it, then they’re not going to opt in.
That said, not getting interest can be valuable information, too, because it helps you validate that the topic isn’t worth pursuing.
The concept and process of validation—whether it’s for a product idea, a webinar, or an entire business—is something I cover in my book Will It Fly?, and in my course Smart From Scratch.
There’s nothing magical about a webinar topic compared to anything else you’re trying to create, whether it’s a course, a book, or a podcast episode. Thankfully, that means that you can apply the same strategies you may already be using to come up with content ideas for other channels to find a webinar topic that will resonate with people.
Six Steps to Find and Validate Your Great Webinar Topic
With all that in mind, I want to share a few different approaches that you can use to find a topic that will get your audience excited to join your next webinar. Keep in mind these strategies aren’t foolproof—even if you do the legwork, you may still find that people aren’t interested. Just remember—this is still valuable information you can use to refine your topic or find a better one!
#1: See how your existing content is performing
Your content is a goldmine to easily determine the topics of proven interest to your audience. For example, if you have a blog, what are your most popular blog posts? Could you build a webinar that goes deeper on that topic or a piece of it? The same thing goes with your podcast. What are your most downloaded episodes? Which of your YouTube videos have the most views and thumbs up? You should also look at your social media channels to find out which pieces of content have gotten the most traction or engagement. (See Number 3 for another way to use social media.)
#2: Check your email marketing stats
Another way to validate your webinar topic is to see how people have “voted” to learn about that topic when they join your email list. You can do this, for example, by tracking how many people join your email list to download a lead magnet, like an ebook or short video course, on a given topic. You can take this approach a step further by using your email service provider to “tag” people who join your list via that lead magnet. (I like ConvertKit for this reason.) You can then follow up with these folks to see what they need additional help with (see Number 4 below) related to that topic and if they might be interested in learning more about it from you in a webinar.
#3: Run a social media poll
One of the great things about all the social media platforms we have access to these days is the ability to connect with and learn from our audiences. A simple but powerful way to use your social media following to identify potential webinar topics is to run a poll. Platforms like Twitter, Instagram, and Facebook, make it easy to create polls that let you seed certain ideas with your audience and see which ones people are interested in.
#4: Talk to people
Running online polls and tracking the performance of blog posts and lead magnets are all great tactics, but maybe my favorite thing to do if you already have access to a community of followers or subscribers is to have one-on-one conversations with people. This helps you better understand your audience’s pains and problems and areas of interest. Something I started doing a few years ago was to randomly select ten people from my email list each month and ask them if they’d be willing to hop on a video call with me to understand what they’re working on and how I can be helpful. Even if you have a small email list, this can be a great way to learn more about what your audience needs, and how you can use that information to create a great webinar topic (among other things!).
#5: Do some research
It’s time to put on your detective hat and do some reconnaissance on the websites and social media pages of other entrepreneurs in your space. See what content they’re creating and what’s getting traction. You should also go outside your direct sphere and see what’s happening in other spaces and industries. You can also try to uncover topics that aren’t getting much coverage yet but that people might be interested in learning about. For example, if there is a brand new social media platform out there, could you be one of the first people to talk about how people can leverage it to build their audiences and their online businesses?
#6: Niche down
If you’re having trouble coming up with a topic, it may be because you’re trying to reach everyone in your audience. Instead, think about a topic that might be underrepresented—even if it applies to a smaller number of people. That said, knowing how narrow to make your topic can be tricky. Go too narrow, and you lose a lot of potential audience that could benefit and learn from what you’re teaching. However, with this approach you’re more likely to become the “go-to” authority for that topic, because there will be fewer competitors talking about it. If you select a more general topic, it may be more difficult to become the expert and go-to resource, but you open up more of an audience. Typically, I recommend going a little more narrow than you might think (based on my experience). But the most important thing is to start with a broader topic that you know people are interested in, so you’ll need to try some of the earlier tactics in this list first so you understand what people actually need help with before you niche down.
Building Out Your Webinar Topic
Once you’ve decided on your overall topic, you need to turn it into a webinar. So how do you get from an idea to an actual webinar? It starts by answering a few key questions:
- What transformation do you want people to experience as a result of attending this webinar and/or taking the actions you recommend in the webinar?
- What outcome(s) do you want for your business from this webinar?
- Related to the previous question, do you plan to sell anything during the webinar, or is the webinar itself going to be the “product”? (You can also do both.)
- Are there any experts or guests who can help you teach this topic and drive both the intended audience transformation and business outcomes of the webinar?
Once you’ve answered these questions, you should start to have an idea of what your webinar will look like!
The next step is to map out the entire webinar in detail, and for this you can use my Post-it Note strategy for planning anything. This is a technique I developed for book writing, but it can apply to any kind of content creation. It’s a great way to plan out all the different sections and subtopics of your webinar and organize them into a coherent structure.
My Post-it Note technique is a straightforward, three-step process:
- Write down each idea for your webinar content on a Post-it Note
- Arrange all the notes
- Use the organized notes to create your webinar!
Check out my “How to Plan Anything (So You Actually Get It Done)” blog post for the full scoop on my Post-it Note strategy!
How Not to Choose a Webinar Topic
A great webinar topic isn’t going to just fall into your lap—but it’s definitely within reach if you’re willing to do some learning and take action outside your comfort zone.
One of the least productive things you can do when it comes to your topic? Guess randomly about what people want in a webinar. I hope this section has given you a good starting point to learn about what your audience wants so you can figure out a webinar topic that will resonate with them.
In this section we’ve talked about how to research and validate your webinar topic beforehand to make sure it’s something people will show up to learn about. But your webinar itself can also be a great way to validate an idea you could build on in other ways—for instance, to see if the topic is something people want to engage with you via a higher-value offering like a course or a membership.
And there’s another great advantage to putting in the time and legwork to find a webinar topic that will resonate with your audience: You’ll not only be giving people what they’re looking for, but you’ll also be more confident when you’re on screen sharing that knowledge with them! That confidence will translate into more trust from your audience, which will build your authority and help you cultivate your own batch of superfans.
Once you’ve chosen your topic, the work of creating your webinar begins by picking a webinar platform.
What’s the Best Webinar Software?
I have a confession: For a long time, webinars were something I avoided doing. Why? I was daunted by the available technology. You see, most webinar software has traditionally not been very user-friendly. Things have gotten a lot better on this front even in the past few years, and there are now more than a dozen options out there for webinar platforms—which creates a whole new dilemma:
How do you know which one to choose?
Choosing Webinar Software: To Zoom or Not to Zoom?
It goes without saying that the software platform you choose for your webinars is really important. It can mean the difference between people showing up and having a great experience, or showing up to a failed webinar that leaves a bad taste in their mouth—or not showing up at all!
I’ve used and recommended my fair share of webinar software solutions over the years, and a lot of them out there are great. When this guide was first written in mid-2020, one tool had become especially popular with the rise of video conferencing during the coronavirus pandemic: Zoom.
It’s not my preferred webinar solution, though.
Don’t get me wrong: Zoom has a lot to offer, and it can work well for some webinars, especially ones where you’re mainly trying to teach rather than collect email addresses or market a product. But if you’re planning on hosting a webinar so you can build your email list, promote a course or other paid product, collect data that will help you optimize future webinars, and provide the best experience to your audience, there’s one tool I recommend above all the others.
It’s called Demio. Let me tell you why I love it.
Why Demio Is the Best Webinar Software Out There
Demio is a software platform that helps you automate and manage your webinars. It also runs in almost any web browser, which makes things easy for your audience. Demio makes it easy for you too, with a super-intuitive interface, lightning-fast support response time (under five minutes), and features like auto-recording for all of your webinars.
I first encountered Demio at a conference hosted by Leadpages in 2017 called Converted. Demio came highly recommended by the people at ConvertKit and Leadpages who I talked to at the conference, and I was excited to check it out. So I did—and it quickly became my go-to choice for hosting webinars.
After loads of trial and error with other webinar platforms, it became clear pretty quickly that Demio was what we’d been looking for. We’d finally found a platform that provides great streaming video quality, is really stable, makes adding guest presenters a snap, and delivers excellent user experiences like public and private chat channels.
I also love Demio for its seamless integration with third-party platforms, and it’s beautiful, easy-to-use interface for both webinar hosts and attendees. Have I mentioned ease of use enough times yet? This benefit is a major calling card for Demio, whether it’s a lack of friction in the user registration process, straightforward webinar setup, easy third-party integration, or the ability to create and direct attendees to a replay video of the webinar.
Demio Is the Webinar Solution for Marketers
As you can probably tell, I really like Demio.
Among all the great benefits and features of Demio I’ve mentioned so far, though, maybe the thing I appreciate the most about this webinar platform is its awesome marketing capabilities. It’s built specifically for people who are marketing and building an audience. Demio is great for anyone who wants to use webinars to promote their products, especially if they’re trying to drive more interaction and participation in those webinars.
These capabilities come through in the form of features that aid audience engagement during the webinar, integration with third-party tools like your email service provider, and analytics to help you optimize the webinar experience.
Audience Experience and Engagement
Demio provides a great chat experience that helps spark audience engagement during your webinar. You can also create polls, and even offer downloadable handouts right in the chat box. You can pop up buttons during the webinar to drive people to a link of your choosing—for example, when you mention your offer and want to send people to a landing page. Demio will even track the click and conversion rates for these buttons. You can set up all these interactive options ahead of time or on the fly to spark engagement.
You can also set up an auto-redirect that takes people to a destination of your choice, like a sales page or a thank-you page, as soon as the webinar is over. Plus, Demio automatically records the webinar and allows you to create an on-demand page right after the webinar where people can access the replay video.
As a marketer, I appreciate all of these features immensely.
Third-Party Integration
Let’s talk a little more about third-party integration, because this is where Demio really shines when it comes to enabling your marketing strategy.
Demio offers extensive integration possibilities with third-party apps, including several popular email service providers and CRM software platforms. Demio’s integration with ConvertKit, our email platform of choice at SPI, makes it nearly worth the cost of admission alone.
Webinars are an important piece of your online marketing toolkit—especially your email marketing. Quite simply, they’re a fantastic tool for building your list. But Demio helps you take advantage of the power of your email list in other ways, too. Demio lets you automate certain email-based actions based on attendee actions during your webinars by creating handy rules, such as If a person watches X percent of the webinar, then send Y email or perform Z action. Or, If a person registers but doesn’t attend, do this instead.
The sophisticated email integration doesn’t stop there. You can also set up one-click registration for Demio webinars by embedding a custom link in an email; that way, the person won’t have to go to a landing page and enter any information. They simply click a link and they’re automatically registered because we already have their email address.
Although I love how Demio integrates with tools like ConvertKit, it has onboard email capabilities too. I typically use ConvertKit to communicate with attendees both before and after each webinar, but you can also handle these communications directly in Demio if you like. It’s versatile!
Analytics
Finally, I also love Demio’s analytics. It gives you lots of data about attendee behavior during the webinar, like when people enter and leave. This can be useful knowledge to help tweak future webinars to maximize the value people get and the amount of time they spend with you.
The data and analytics we get from Demio provide some really great insight for us into things like…
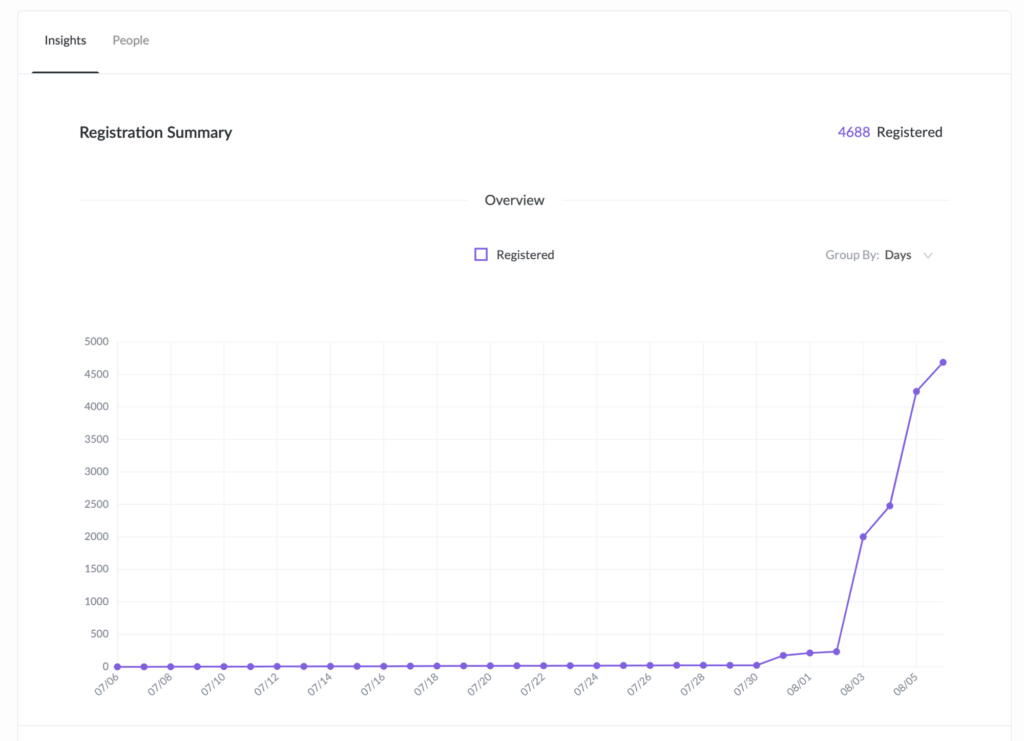
Webinar registration trends:
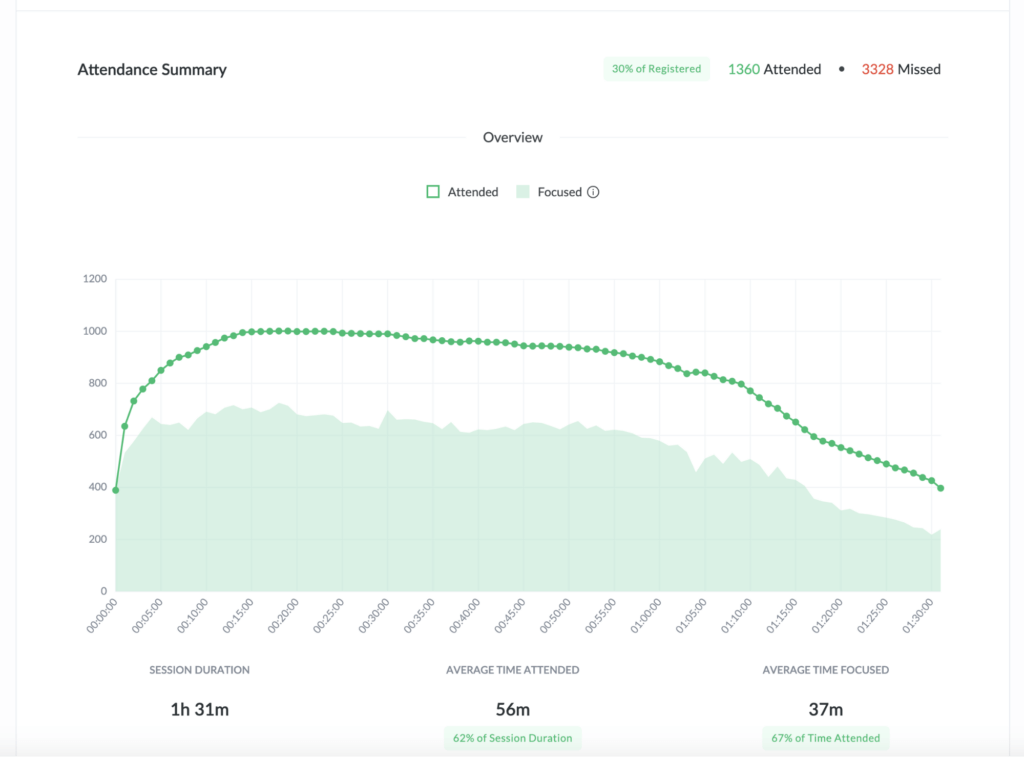
How well we’re retaining people’s attention during the webinar:
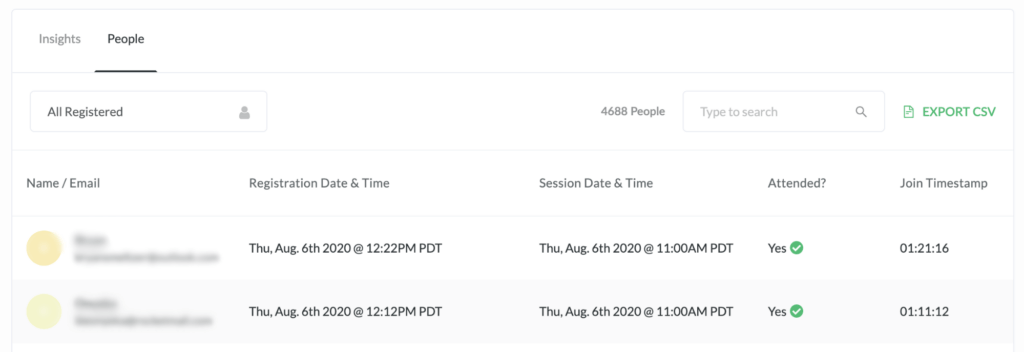
Individual insights on who attended and when they joined:
And even how people gravitated toward the resources we shared during the webinar:
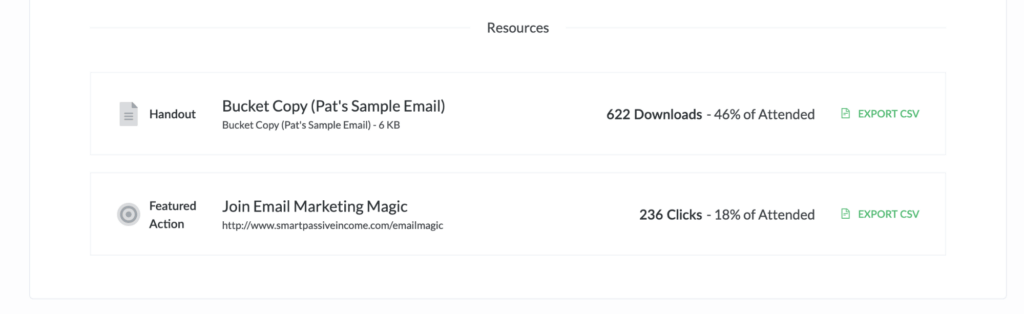
Getting data about resources we share on the webinar is an especially cool feature of Demio that many other platforms don’t have. In the screenshot above, the first resource is a handout and the second is a link to a landing page for the product we’re promoting. We can compare this data to similar data for promotions in other webinars to see how they stack up and make informed decisions about what’s working or not.
(All of the screenshots are from a webinar we did in mid-2020 for my email marketing course, Email Marketing Magic.)
If you want to dig into all that Demio has to offer, check out the Features page on their website.
Downsides of Demio
No platform is perfect, and Demio is no exception. The main area where Demio falls short in my mind (as do many other webinar platforms) is recording quality. That’s why if you want to record your webinar, I recommend you use another application, like ScreenFlow or QuickTime for Mac, or Camtasia for Windows (assuming your computer is powerful enough to handle it). These software options offer higher-resolution recordings than Demio does.
Demio Pricing
In terms of pricing, Demio is competitive with other platforms. It’s not necessarily cheap, especially if you regularly host webinars with hundreds of attendees. But the pricing depends on how many attendees you’d like to have. And if you’re just getting started with webinars, then you probably don’t have that many people showing up yet, and Demio’s “Starter” price point, which gives you up to fifty attendees for $34 per month, is pretty darn affordable.
On the other end of things, Demio’s pricing for the highest plan, which allows up to 1,000 attendees on each webinar, is $369 per month. Here’s how that plan compares to similar plans from a few other webinar platforms:
- Demio: 1,000 attendees for $369
- GoToWebinar: 3,000 attendees for $399 (or 500 for $199; no option for 1,000 attendees)
- WebinarNinja: 1,000 attendees (max) for $199
- Livestorm: 500 attendees (max) for $319
- Zoom: 1,000 attendees for $340 (options up to 10,000 attendees for $6,490)
What if you need a webinar solution that allows more than 1,000 attendees at a time? Well, first, congratulations, because you’re doing something right! And second, there are several other webinar platforms out there that will work for you.
Thankfully, I’ve been happy with Demio—even when more than 1,000 people show up to one of my webinars. It’s rare (even at my level, with 250,000 email subscribers) to get close to the 1,000-person threshold. We’ve had a few times where we’ve hit the limit, and in those cases people had to either wait or weren’t able to join the webinar. This does add a little scarcity and encourages people to stick around and watch all the way through if they managed to make it in.
(Note: If you visit the Demio website, you may not see the 1,000-attendee plan listed in the options. You’ll have to talk to the Demio customer support team to sign up for this plan. They did this so people don’t accidentally sign up for the most expensive plan!)
No More Webinar Fear
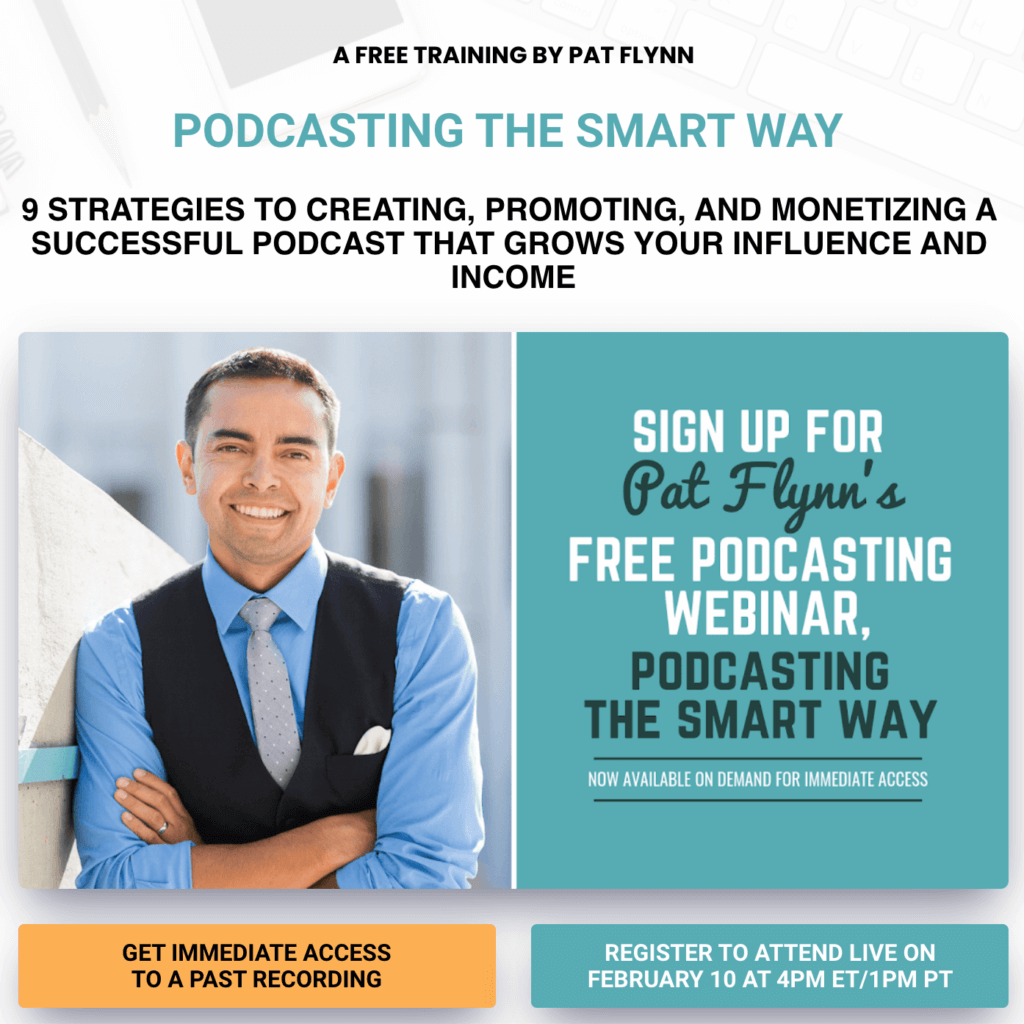
With Demio, I’ve overcome my fear of webinar tech, and I’m hosting a lot of successful webinars now, including Podcasting the Smart Way and my Affiliate Marketing Masterclass.
By the way, in addition to all the benefits and features of the webinar software itself, the Demio team is great. Their customer support is amazing—I already told you about their five-minute response time! And they’re continually working on improving the platform so hosts and attendees have a great experience.
If you’ve been looking into creating webinars, whether it’s to superpower your sales funnel or just connect with your audience, you’re going to want to check out Demio. To learn more about the benefits and features of Demio and try it for yourself, go to smartpassiveincome.com/demio.
Don’t Forget These Additional Webinar Software Options
A webinar platform like Demio is the most crucial piece of software you’ll need to host a successful webinar. But there are a few other software options to keep in mind if you want to maximize the success of your webinar. Here are a few more apps to consider:
EcammLive for Screen Sharing
A piece of software I love to integrate into my webinars is something called Ecamm Live. This is a Mac app that lets you do some really cool things while you’re broadcasting. With a click of a button, you can add graphics and sound effects and other touches to spice things up. And you can do all this without leaving your webinar software. To see Ecamm Live in action, check out this video:
Email Service Provider
This is more of a web solution than a standalone app, but integrating your email service provider (ESP) with your webinar platform is an important way to connect with your webinar registrants and attendees both before and after the show. You can use your email list to reach out and remind people beforehand, and follow up with them with links to the webinar replay and your sales offer. Don’t forget that you can also use your webinar to directly build your email list, and integrating your webinar software with your ESP makes that even easier to do.
Slide Sharing/Presentation Software
Finally, if you’re planning on sharing slides, you’ll need a slide-creation app like Keynote or PowerPoint.
Software is the first crucial piece when it comes to the nuts and bolts of a successful webinar experience. The second piece is hardware, so let’s talk about the equipment you’ll need to make sure you deliver a high-quality, high-fidelity webinar every time.
Which Equipment Do I Need to Run a Successful Webinar?
What equipment do you need to run a successful webinar? I’ve got you covered! Let’s cut right to the chase. There are four key things you need to make sure you look and sound great, and your attendees have a great experience throughout your webinar:
Let’s dig into them!
Note: This section contains affiliate links. Read our full affiliate disclaimer here.
A Webcam
Okay, you could do a webinar composed entirely of slides (see the software section), but how exciting would that be? It’s important to show up on camera, especially at the beginning when you welcome people in. People want to see who they’re learning from. So give the people what they want—your face!
That means you’re going to need a webcam.
Now, if you’re really afraid of putting your face on camera during your webinar, all is not lost. You can still make it work. Yes, there are successful, high-converting webinars out there that go right into slides from the start. But if you want to spur engagement and help people get to know you, I truly believe in showing up on screen for at least part of your webinar.
There’s a good chance your computer (especially if it’s a laptop) already comes with a webcam, and that can work—but it’s not ideal. Built-in webcams are fine for things like Zoom meetings, but a webinar is an event, and you’re going to want a little more in terms of picture quality.
That’s why I highly recommend investing in something a little nicer—not just for webinars, but for any video recording or web conferencing. The camera I’d recommend at more of an entry level is the Logitech C920. If you’re willing to spend a little more, I suggest the Logitech BRIO 4k.
If you already own a high-quality DSLR camera that you want to use as your webcam, there’s an option for you. The Elgato Cam Link 4k USB capture device lets you hook up your DSLR to your computer (as long as the camera has an HDMI output).
[Note: As of the writing of this section in fall 2020, some of these devices were out of stock or retailing at costs that put them out of “budget” range. Unfortunately, the rise of online video activity as a result of the 2020 COVID lockdown led to markups and stocking issues on a lot of audio and video tech.]
Good Lighting
If you’re planning to be on camera during your webinar (and I hope you are!), good lighting goes a very long way. Who doesn’t want to look their best to their audience?
Thankfully, good lighting is not that difficult to achieve. And it definitely doesn’t have to be expensive. I’ve got a short video on lighting best practices for you below. It explains a few easy but effective ways to get great lighting for your webinar (and any other indoor video recording you want to do).
Caleb Wojcik, my videographer, is a guest on this video, and he shares some awesome tips on how to use things you already have access to, like windows and other room lighting sources, to achieve that perfect glow.
For example, when your face is on screen during your webinar, you want the light in front of you, not behind you. If you happen to be facing a window and have your webcam pointing back at you, that’s going to give you the best wash on your face. Camera positioning is also really important—check out the video to learn more.
Of course, lighting can get much fancier (and yes, pricier), but if you’re ready to take things to the next level, check out the lighting setup in my broadcast studio at patflynn.com/livesetup.
One more resource for you—this episode of AskPat where I show you how to use an unused space to create an honest-to-goodness video studio, including some more lighting ideas:
A Fast, Stable Internet Connection
Internet speed is a massively important component of having a great webinar because you’ll be streaming live and probably using a lot of bandwidth.
One of the cool things about Demio, my preferred webinar platform, is that it will check your internet speed for you and let you know if it’s adequate to run your webinar smoothly. If you get a lousy grade from the Demio test, it might be worth talking to your internet service provider (ISP) to find out about upgrading to a higher service tier that provides more bandwidth, measured in megabits per second (Mbps).
Thankfully, there are a couple of other factors you can look at to ensure you provide the best webinar experience with high-quality audio and video and no freezing or glitches that will raise your audience’s blood pressure.
The first are two “low-hanging fruit” steps that seem simple but can make a big difference in your attendees’ webinar experience. First, quit all unnecessary apps on your computer before you start your webinar. Second, make sure no one else on your network is using a ton of bandwidth, like watching a 4K video on Netflix (or presenting another webinar). This is especially important if you work from home, where your internet connection may not be as fast as a typical office network.
Speaking of internet speed, even if you have a fast connection, it also needs to be stable. A great and simple way to improve the stability of your internet is to ditch the wireless and wire your computer to your router during the webinar. Invest in some ethernet cable and run a line from your internet router to your computer. Some newer Mac laptops don’t have an Ethernet port, but you can purchase an Ethernet–USB adapter.
Finally, even if you have a fast, stable internet connection, your computer hardware can still hold things back. When it comes to the processing hardware inside your computer, the faster the better. I’ve had trouble on things like a MacBook Air, where the processors are just not powerful enough for streaming live video. The more powerful your computer, the better chance you’re going to have a smoother webinar experience.
It’s not that you can’t host a webinar with an underpowered computer, but it’s going to be suboptimal. You’ll have more lag, blurrier video, and even glitching and freezing. I definitely suggest switching to a wired internet connection and upgrading your internet service first, but if you’ve tried those steps and things still aren’t running smoothly, it might be time to upgrade your hardware.
Audio Equipment (A Good Microphone)
In addition to video equipment, choosing the right audio equipment is really important. The better your audio gear, the better the quality of your broadcast.
The microphone I currently recommend is the Samson Q2U. I love it for its great sound quality and because it connects directly to your computer via USB. If you head over to kit.co/patflynn, you can check out my “Beginner Podcasting Kit (That Sounds PRO),” which includes the Q2U mic, plus a boom arm and a shockmount to go with the mic. These two extra items will help you get the most out of the Q2U. The boom arm lets you easily adjust the placement of the microphone, and the shockmount suspends your microphone “in the air” using bands that absorb any unwanted desk noise or computer frequencies that could make their way into your webinar.
The AKG Lyra is another awesome streaming and live video microphone that sits nicely on your desk (as opposed to needing a separate stand). It has aesthetic similarities to the popular Blue Yeti, but it sounds much better and it’s much more economical, too. What’s nice is because it sits on the table, it’s out of your face and it can just be sort of next to you instead of right in front of you, like some other podcast mics.
If you don’t have access to those microphones, you can use your computer’s built-in microphone, or a set of cheap earbuds (the kind with a built-in mic). I don’t recommend either of these options, though. If you have to go with one of them, I’d choose the ear buds, as the microphone can be placed closer to your face to provide a bit more vocal resonance. This is going to be a much better option than your built-in laptop mic, which will pick up a lot of room noise and sound a lot more tinny.
Bottom line: Be willing to spend a little to upgrade your microphone, because it will make a big difference in terms of how well people can hear you—and how much they enjoy listening to your webinar.
The Next Level of Webinar Equipment
In terms of your webinar equipment, the stuff we’ve talked about in this section is really all you need: a high-quality camera, solid internet, a good mic, and decent lighting, and you’re well equipped to put together a top-notch webinar.
But if the entry level isn’t cutting it for you, there’s still plenty of room to grow when it comes to your webinar equipment. If you want to step up your game, check out patflynn.com/livesetup, where you can see all the gear I’m currently using in my studio to get a high-quality, broadcast feel on all of my webinars and YouTube videos. In fact, as of the writing of this guide, I’d been streaming live every day on my YouTube channel for half a year, so I’ve been putting all this equipment to good use!
Now that you know the most important elements that go into creating a great webinar, how to choose your topic, and what software and hardware will help you deliver a smooth experience, let’s shift gears and talk about what it takes to actually get people to show up. That’s right: Webinar marketing is up next!
Get your free Webinar Cheat Sheet.
Planning a webinar doesn’t have to be hard. Our free cheat sheet will walk you, step by step, through everything you need to prepare for the perfect webinar.
Webinar Marketing: How to Get People to Show Up to Your Webinar
Like any product, service, or event, you need to market your webinar if you want people to actually register and show up. One of the unique things about webinar marketing is that you need to focus on both of those actions—registration and attendance—which adds an extra layer to think about when it comes to creating a great webinar marketing plan.
Thankfully, I’ve got you covered with these seven keys to successful webinar marketing, which I’ve learned through building and marketing my own highly successful webinars.
The Seven Keys of Webinar Marketing Success
Here are the seven guidelines that have helped me successfully market each of my webinars.
Webinar Marketing Key #1: Have an awesome topic
The first and most important thing when it comes to getting people to show up to your webinar doesn’t actually have to do with marketing. It’s having a topic worth showing up for—which means good webinar marketing starts way before you market anything. A great webinar is built around the needs, wants, and intended outcomes of your target audience. This means doing research, having conversations, and using analytics from the platforms you use to connect with your audience to uncover a webinar topic that will get people to show up.
Webinar Marketing Key #2: Get the language right
In SPI Podcast session 424, Ann Handley stops by to help us all hone our marketing messaging so that we can better connect with our audience—and turn them into raving fans—by speaking the language that will resonate with them.
Webinar Marketing Key #3: Give yourself enough lead time
If you want people to actually show up, you need to give enough lead time to market your webinar. If you first tell people about your webinar the day before it happens, well, guess what? You’re not going to get a lot of people to show up.
At minimum, I would start marketing your webinar one week ahead of time. However, two to three weeks is optimal. During that time, your job is twofold: collect more registrations and remind people who’ve already registered why they need to show up. Don’t start marketing your webinar too early, though; any more than two or three weeks, and you’re going to need to send lots of reminders (see #6) so people don’t forget.
Webinar Marketing Key #4: Have a great registration page
Your webinar registration landing page is one of the most important assets you’ll use to get people to sign up for your webinar. Take a look at a few example landing pages for some of my webinars (all made with Leadpages [affiliate link]):

You’ll notice that all the landing pages have a few elements in common:
- First, there’s the title of the webinar at the top, followed by subtitle or value proposition (i.e., what you’ll learn at the webinar).
- Then there’s a picture of me (plus any additional hosts), because people connect with faces and want to see who they’ll be learning from.
- In the next section are some bullet points that go into more depth about the content of the webinar and what people will get from it.
- Then there’s my bio, which further explains why people should feel confident learning from me on the webinar.
- Last but not least, there are registration buttons at multiple points on the page so people can easily click to sign up.
Oh, and sometimes I throw in a countdown timer to create a little urgency. 😉 Speaking of urgency …
Webinar Marketing Key #5: Sprinkle in some scarcity and FOMO
Depending on the webinar platform you use, there might be a limited number of seats available in your webinar. So mention it! The fact that you’re providing a limited opportunity can incentivize people to register before someone else takes their spot.
Related to scarcity is fear of missing out, or FOMO. This is a common strategy in copywriting, which is all about amplifying the consequences of not showing up. In your webinar marketing materials, focus on what might happen if a person doesn’t show up—like being outpaced by their competition or missing out on some form of business or personal development.
Finally, even if you plan to provide a webinar replay, or run the webinar again in the future, there’s still an added benefit to being there when it happens live, particularly in terms of access to the Q&A portion to get custom advice from you. So make sure you remind people about this fact!
Webinar Marketing Key #6: Send email reminders
Even if someone has already registered for your webinar, you want to maximize the chances they’ll actually show up, i.e., improve your conversion rate. A lot of people register because they’re worried about missing out, but then they don’t take action to actually join the webinar. Why? Maybe there wasn’t enough incentive, or they lost interest, or they just forgot about it. That’s why you need to remind people about the webinar after they register—and email is the best way to do it.
Email reminders help keep your webinar top of mind and remind people what they’ll gain by being there (and missing out on if they don’t). For most webinars, you can expect roughly a 15 to 20 percent conversion rate of registrants showing up—but we can do better than that, and that’s why reminder emails are crucial.
So what exactly do these reminder emails look like? There are three main types I like to send to my webinar registrants:
- A logical email. An email that clearly describes why your webinar is something people need to take advantage of right now: what the outcome will be if they join, and what they’ll miss out on if they don’t.
- An emotional email. This one might include a story about one of your students or clients who needed similar assistance to what you’ll be providing in the webinar and how they achieved their desired transformation. Then remind people that this is what you’ll be addressing in the webinar too. Focus on the emotion and storytelling, and this kind of email will go a long way in convincing people to show up.
- A proof email. Similar to the previous email, this one shows how the things you’re going to cover in the webinar will have a clear result for people by sharing proof of how it’s worked for other people, just in a less emotionally targeted way.
These three email types definitely share some overlap with each other, but they’re meant to give you a starting point for creating your own effective webinar reminders.
For a great example of how to use student success stories to add powerful social proof to your marketing emails, check out the case study of Steve Chou in the SPI Essential Guide to Email Marketing.
And by the way, another easy form of social proof you can provide in your emails is to let people know how many others have registered for the webinar. Nobody wants to be the only one at a party!
Webinar Marketing Key #7: Offer some sort of incentive
This could be a gift you send people ahead of time, or something you share with them during or after the webinar (or both!). Think of it as a lead magnet for your webinar. Also remember that the experience of the webinar itself should be full of incentives. Mention the things people will learn, as well as the fact that they’ll be getting access to you and the opportunity to ask you questions. That’s huge!
Get Amped for Your Webinar
Finally, it’s important to share in your marketing how excited you are about your webinar. If you’re motivated, it’ll show through everywhere you talk about the webinar, in your landing pages, emails, and elsewhere—and will hopefully get other people excited to be there, too.
As a side note, it’s okay if not everybody shows up to your webinar! You’ll have more chances to reach these folks later on, which we’ll talk about in the section on follow up.
So those are just a few ways you can make your webinar marketing more effective. Marketing is obviously a huge topic, and if you want to really dive in, check out my digital marketing guide.
Our next step in this webinar journey is to dig into the guts of your webinar itself, and explore how you can make it as engaging as possible for everybody who attends!
How to Host a Highly Engaging Webinar
All right! The big day is approaching. You’ve learned all about what goes into making a great webinar. You’ve got your webinar gear and webinar software set up, you picked a webinar topic and you know it like the back of your hand, so you’re ready to share everything you know with your audience. Plus, thanks to your excellent webinar marketing, you’ve got a bunch of people registered—some of them are even telling you how excited they are about it on social media!
Now you need to turn your attention to creating a webinar experience that will keep your attendees alert and excited about what you’re sharing.
My 10 Tips for Making Your Webinar More Engaging
Here are my top tips for making your webinar as engaging as possible.
Engaging Webinar Tip 1: Set the tone
The first thing you need to do to create a highly engaging webinar is set the expectation that it will be a webinar worth watching. Not just that—a webinar people will be excited to participate in, too. This is crucial: when you get people involved, they’re more likely to stick around, to pay attention, and to take action with you.
The beginning of your webinar is the perfect time to invigorate your audience and get them excited about the path you’ll be taking together. Start by giving people a roadmap and a sense of what to expect in the rest of the webinar. You don’t have to reveal your entire presentation upfront, but you should hit on the key themes.
Think about it this way: there will be people at your webinar who might have registered a long time ago and forgotten why they signed up in the first place. And some folks may just be having a down day and need a little motivation. Your job is to get them excited about the next hour or so that they’ll be spending with you.
Engaging Webinar Tip 2: Get interactive
Engage with your audience right from the start. Mention people’s names (see Number 4) and ask them where they’re from. Most webinar software platforms will have a chat function that lets people share comments with the entire audience, so encourage people to share their answers via chat. Engaging like this right from the start will set the precedent for the rest of the presentation. It’ll help people feel welcomed and included right away, and encourage them to get comfortable with the webinar software interface.
All of this goes a very long way toward creating an engaging, interactive webinar!
Engaging Webinar Tip 3: Poll the people
You can take that interactivity and inclusion a step further during the webinar by running polls. Why polls? Polls are a great way to keep people engaged and encourage interaction, as well as to learn more about your audience.
That said, you should only run a poll if you’re looking for relevant information or trying to prove a point about the information you’re sharing in the webinar. Doing a poll just for the sake of it can backfire. I’ve been on webinars where the presenter asked what everyone’s favorite color was. Don’t waste people’s time.
You also want to make sure everybody’s included in some way. Unfortunately, some webinar presenters have the bad habit of asking questions that get some of the audience to participate, but not everyone. Don’t leave anybody out. For example, if you’re going to ask your audience who’s doing affiliate marketing, you may want to also ask the people who aren’t doing it if they’ve tried it before and why they’re not doing it. That way, you give everybody a chance to raise their hand.
Obviously check with your webinar software platform to see whether it offers a poll function (and it should!).
Engaging Webinar Tip 4: Say people’s names
When a person hears their name, it’s the best thing in the world, right? To paraphrase Dale Carnegie, the most beautiful sound to a person is the sound of their own name. And that’s what you want to do during your webinar: mention people’s names when you’re addressing them or referring to them. Saying a person’s name is a great way to get their attention—remember when you were in school and the teacher would start calling people’s names, and everyone was on the edge of their seat, wondering if their name would be called?
It’s like that, except more fun.
Engaging Webinar Tip 5: Create open loops
For any type of content, whether it’s blog posts, podcast episodes, videos, or yep, live webinars, creating open loops can keep people engaged and anticipating what’s coming. So what exactly is an open loop? Think of it as a cliffhanger. You break up your webinar content into pieces, and at the end of each piece, you tease what’s coming next.
It’s a great, simple way to keep people interested and excited about what’s to come.
Engaging Webinar Tip 6: Use pattern interrupts
Pattern interrupts are an important way to break up monotony during your webinar and keep people engaged. When someone is watching or listening to something for a long time, it’s easy to tune out, so you need to offer moments that draw them back in.
Pattern interrupts can be accomplished in a number of different ways. The simplest way might be to change up what’s on screen. Switching back and forth between slides and your webcam is a great way to interrupt the pattern. If you have multiple cameras, you can even switch between camera angles to keep things interesting.
Another easy pattern interrupt is to take a breather once in a while and check in with the audience. After each section of your presentation, switch from professional presentation mode and into engagement mode by saying things like, “Hey everybody, let me know what the most relevant or most surprising part of the last section was for you.” You can even mention names and thank people. This gives everybody a chance to settle before diving back in.
Another way to pattern interrupt is to tell a story. If you’re showing slides, turn them off or pause them and say, “I want to tell you a story…” All eyes (and ears) will be on you as you go deeper into an event, moment, or lesson that relates to the content of your presentation. A good story can be transporting. It helps put your audience at ease and relate to you. And if you’re doing a lot of teaching and slide sharing, telling a story can give your audience members a nice break from listening intently and taking notes.
Finally, you can change the dynamics of your voice. Getting softer or louder in certain moments, and slowing down at points where you want people to feel the impact of what you’re sharing—this can add a lot to the storytelling and overall effect of your presentation.
Engaging Webinar Tip 7: Ask people if they’re getting value
This is a simple strategy that can pay off big for you. At certain times in the presentation, ask people if they’re enjoying the content and learning from it. This creates another moment where people can participate and stay engaged, and gives you some good info about what’s working well in the webinar so far (or not).
Engaging Webinar Tip 8: Host a Q&A
Whether you decide to answer questions as you go along or save them until the end to keep people around, a Q&A is a great way to keep people engaged. I prefer to leave mine until the end. Why? Taking questions during the presentation can derail momentum and flow, especially if the questions are longer and personalized. It can make others feel left out, especially if they already know the answer or the question is irrelevant to them.
Leaving the Q&A until the end also gives you a chance to collect more questions to address.
However, if I do see a relevant question in the chat before the end, I will address it if it does make sense. Use your judgment!
The most important thing to do is make sure that you have access to the chat function throughout the webinar. But if you’re sharing slides in full screen, you may not be able to see the chat window all the time. So it might be smart to pick up a second computer or use another device, like a mobile phone, just for chat. I’ll typically add myself to the webinar as a panelist using a second email address. This gives me chat and admin/moderator control so that I can see everything and engage with the audience on the secondary device while I’m full screen with my slides on the main account. That way, if there are any questions, I don’t have to stop the slides, then go back to camera, then share my screen again.
Try to make things only as complicated as they need to be!
Engaging Webinar Tip 9: Stay on point
Don’t dilly-dally or add a lot of fluff. It’s great to add some personal touches and comments during the presentation to help build your relationship with the audience, but keep it within reason. Also, don’t keep the webinar going longer than advertised. People are giving you their valuable time, and you want to respect it.
Engaging Webinar Tip 10: Recap
At the end, you’ll want to recap what you’ve shared in the webinar. You can also do mini-recaps at points during the webinar. It’s up to you how often to do this, and it’ll depend on how much material you’re presenting. But these mini-recaps can be especially helpful for people who join after the webinar starts. It’s also a good idea to do “cumulative” recaps, where you cover not just the most recent three points you covered, for example, but the ones that came before them as well—a “re-recap,” if you will.
Deliver Your Best Webinar
I won’t lie to you—hosting a webinar is fun, but it’s also a lot of work. You need to start with your best and end with your best, and that takes planning, focus, and effort. I hope these ten tips have given you some starting points to deliver your best and keep people engaged throughout the webinar.
My final piece of advice for creating an engaging webinar is something I mentioned in tip 8: Wherever and however you can, keep things as simple as possible. That way, you can be focused on the most important part of your webinar: serving your audience and keeping people engaged. Bells and whistles won’t make up for a lack of preparation or underwhelming content, so focus on what matters.
In the next section, we’ll talk about how to use your webinar to sell something—a product, course, another webinar, or something else entirely—in a way that’s not sleazy and that’ll get people to take action.
How to Sell a Product on Your Webinar (without Annoying Your Audience)
Selling a product on a webinar can be scary. A lot of people avoid doing it because they’re afraid of upsetting their audience or losing their trust. Have no fear! In this section, I’m going to show you that there is a way to sell and serve on your webinar at the same time.
Adopting the Webinar Sales Mindset
Selling and serving at the same time. When you commit to doing both on your webinar, you quickly start to see that selling is not a bad thing! As long as you’re selling something of value that can indeed help people, and you work to earn their trust, then selling can even feel obvious and natural. It can feel like something you should be doing.
The SPI archives contain a number of podcast episodes and blog posts about overcoming internal objections to selling. The first one I want to recommend is a clip from an episode of my daily YouTube streaming show, the Income Stream, featuring Chalene Johnson:
Chalene joins the show at about 25:50. Watch for some excellent tips on getting into the mindset of selling. You’ll hopefully come away understanding that if you have a lot of value to offer, selling should feel natural and obvious.
Here are two podcast episodes that will help with getting into a sales mindset:
So getting the mindset piece right is the crucial first step. But then how do you put that into action on your webinar? How do you sell your product on your webinar in a thoughtful way that doesn’t get in the way of teaching and providing value for the people who show up?
I spent a lot of time working through this sales mindset stuff, because to be honest, the idea of selling on a webinar was something that made me feel gross. Part of that had to do with some of my experiences as a webinar attendee. I’d sit through 45 minutes of a big emotional story—then all of a sudden, a pitch for a $1,000 product! Yes, that kind of pitch can work sometimes, but it’s not how I sell on my webinars, and it’s not what I want to teach you here.
Before You Sell Anything on Your Webinar, Provide Value First
Instead, I want to emphasize the importance of first providing value on your webinar, and then offering your webinar audience something that makes sense for them—and pitching it in a way that’s not going to make people hate you for it or make you feel slimy about it.
Ultimately, you’re hosting your webinar to help people. And so you want even the folks who don’t purchase anything from you to thank you for the webinar.
So, making sure that your webinar content is packed with value is an absolute must. That means picking a great topic, and making the entire webinar experience engaging. Each person should leave with something they can put to use right away and feel like their time spent with you was hugely worthwhile.
Because guess what? If you get this part right and your audience sees that there’s a lot of value in what you have to share, they’re much more likely to stick around for the whole webinar and be open to hearing your product pitch.
Laying the Groundwork for a Successful Pitch
I’ve run over a hundred webinars at this point. Even though I used to be afraid of using webinars to sell, I now sell on roughly half of them—and each time I feel really comfortable doing so. Here are the two things I do consistently to help put the audience at ease about being pitched to.
Strategy #1: Let Them Know You’ll Be Pitching
The first simple thing I do in every sales webinar that puts both me and my audience at ease is to be upfront about the fact that I’ll be pitching something later on.
Take my podcasting webinar, which includes a lot of detail on how to get started with your own podcast, followed by a pitch for my Power-Up Podcasting course. After I welcome people in and cover some webinar housekeeping items, I give them a heads-up about what’s coming. It usually goes something like this:
“You’re about to learn a lot. In fact, you’re going to get an open window into the material you’ll find in my Power-Up Podcasting course. If you want to go deeper with this material, I’ll share more information about Power-Up Podcasting at the end of the webinar, along with a special offer. But either way, as long as you stick around and pay attention, you’re going to get a lot of value, whether you take advantage of the offer or not.”
This way, I’m letting people know upfront that an offer is coming, which deflates any worry or nervousness about a potential bait-and-switch. Also, pointing out that some of the webinar content has been taken from my paid course increases the perceived value of that content among the webinar audience.
So that’s how to introduce the fact that you’re going to be selling on your webinar, to set expectations and put people’s minds at ease. But that’s not all. There’s a second strategy you can use to prepare people for your pitch—and even get them looking forward to it.
Strategy #2: Showcase Your Students & Customers
The second way to get people prepped for your pitch is to pepper your webinar content with real examples from students who have used your product or taken your course. Not as testimonials—testimonials are important, and they can indeed help you when it comes time to pitch at the end—but as stories embedded organically into the content of the webinar.
For example, in our podcasting webinar, before we go into the meat and potatoes of the content—things like which microphone to buy, how to edit your podcast, and how to launch your show—I cover some objections people might have and myths we have to debunk. That’s right—we start by addressing mindset.
In terms of podcasting, one of the myths we work to overcome in this webinar is the belief that you need to have a popular topic or a large potential audience to succeed.
I show people how that’s actually not true by using examples of students who’ve taken Power-Up Podcasting. Take Phil Lichtenberger, host of Scanner School, who launched his show after taking the course, and after just twenty-two episodes he’d gotten thousands of downloads. He’d even cultivated some superfans for his show about the niche scanner radio hobby. I share a screenshot of his podcast and some messages he’s gotten from those new superfans—people who join him on every live stream, who interact with him on Twitter, and so on. These are new relationships that have come about just because of the podcast.
Using Phil’s example helps crush the objection that people might have about creating a show for a niche audience. It also shows that he was a student of my course—without my needing to directly sell the course.
Another myth I tackle upfront in my podcasting webinar is the idea that you have to have an audience before you start your podcast—whether it’s through your email list or blog or a website or somewhere else—in order to succeed.
I share the story of Sophie Walker, another Power-Up Podcasting student and the host of Australian Birth Stories. She launched with zero email list, zero audience—nothing. But her show helped her build a huge audience. In fact, her podcast episodes have been downloaded millions of times, and the experience has completely changed her life.
So the truth is you don’t need to start with an audience in place—your podcast can build one for you. And I use an example like Sophie’s to support my case, while also providing an amazing plug for the course, ninja-style.
Batter Up: Time to Make the Pitch
The two tactics we just covered—mentioning the product upfront and alerting them that you’ll be pitching later, and inserting student success stories—can go a long way in getting people ready and excited to hear your pitch.
So how do you go about, you know, making the pitch itself? Let’s dig in.
First off, in every sales webinar I do, after the main content portion is over and I’m about to launch into my pitch, I ask the audience for permission to talk about the product I’m offering. Even if you get just one “yes,” that’s one person who wants to know more. Getting that validation can give you a lot of energy and confidence as you begin to pitch your product.
Next, when the pitch starts, don’t waffle—go right into it. Be clear about what the product is, but don’t spend too long getting into all the details. This is the part where people tend to drop off, but if you can keep things exciting and high level, you’ll keep a good portion of your audience engaged.
For my Power-Up Podcasting course, I take people through the course modules quickly, using that time as a selling opportunity. For example, in the podcasting promotion section of the course, I’ll mention that module five covers your podcast prelaunch strategy, which is important for getting the most listeners on day one. I walk them through some of the content in the module, to both teach a little bit and sell them on the value of the course.
Once you’ve used the content to sell people on the value of the course, you can start to share the terms of your offer: cost, any discount or bonuses, when the offer expires, and any other terms (like a no-questions-asked refund policy).
As I’m wrapping up the pitch, I like to “deflate” the sale a little bit by redirecting attention away from the product itself and onto the people who’ve had success with it. This is where you can inject some testimonials to drive home the value your course or product can provide.
Finally, you’ll want to spend time speaking to people who are on the fence. I usually say something like this:
“If this is something you really want but can’t afford right now—if you’re going to have to dig into your savings or withdraw from your retirement account to pay for it—don’t do it. I still want to help you. You can rewatch the replay of this webinar, or listen to episodes of my podcast that cover the same topic. But if you’re ready to invest in your future, to get access to more information, along with some hand-holding and accountability, I want to help you cut through the noise, reduce the overwhelm, and help you achieve results faster than you could otherwise.”
Boom. Now go out and sell.
Now that your webinar’s over, you’re done—right? In fact, your webinar journey has only begun! The section How to Follow Up After Your Webinar tells you everything you need to know about following up after your webinar to continue growing your audience, teaching and serving more people, and landing more sales.
How to Follow Up After Your Webinar
You just wrapped your webinar, and it was a hit! So what’s next? Your work’s not done—but thankfully neither is your opportunity to reach more people. You have a valuable resource in hand you can use for ongoing marketing and audience building, which is your webinar recording. This section will show you how to put it to good use as part of a webinar follow-up strategy.
Why Should You Follow Up After Your Webinar?
Here are the key benefits of following up after your webinar:
- Educating your audience through your webinar
- Increasing sales of your promoted offer
- Growing your email list
At SPI, we use webinars for educating, as well as to promote our products, primarily our courses. In fact, the bulk of our sales happen after the webinar is over—which should give you a sense of just how important it is to follow up after your webinar.
The heart of your webinar follow-up strategy is your email follow-up sequence. This is a series of emails and messages that you send after the webinar’s over. With a little time and care in setting up your webinar follow-up sequence, you can put that replay to its best use. You can use the webinar replay as a bonus training resource that people get access to for joining your email list. And of course, you can use it to guide people to take action on the offer you promoted in your webinar.
Before you start sending emails, though, you’ll need to make your webinar recording available, so let’s briefly go over the mechanics of doing that.
How to Host Your Webinar Replay
As far as the mechanics of hosting and sharing your webinar replay, there’s a number of different ways to do it. At SPI, we use Demio [affiliate link] to hold our webinars and create and host webinar replays. There are other tools that let you host your webinar and webinar replay, including GoToWebinar, WebinarJam, and several others, but Demio is our platform of choice.
What if you don’t use a dedicated webinar platform? You could post the webinar via an unlisted YouTube video or another video platform like Wistia. You won’t get the analytics a tool like Demio gives you, but it’s a straightforward way to make your webinar replay available.
You can also embed it on a landing page on your website, like we did here:
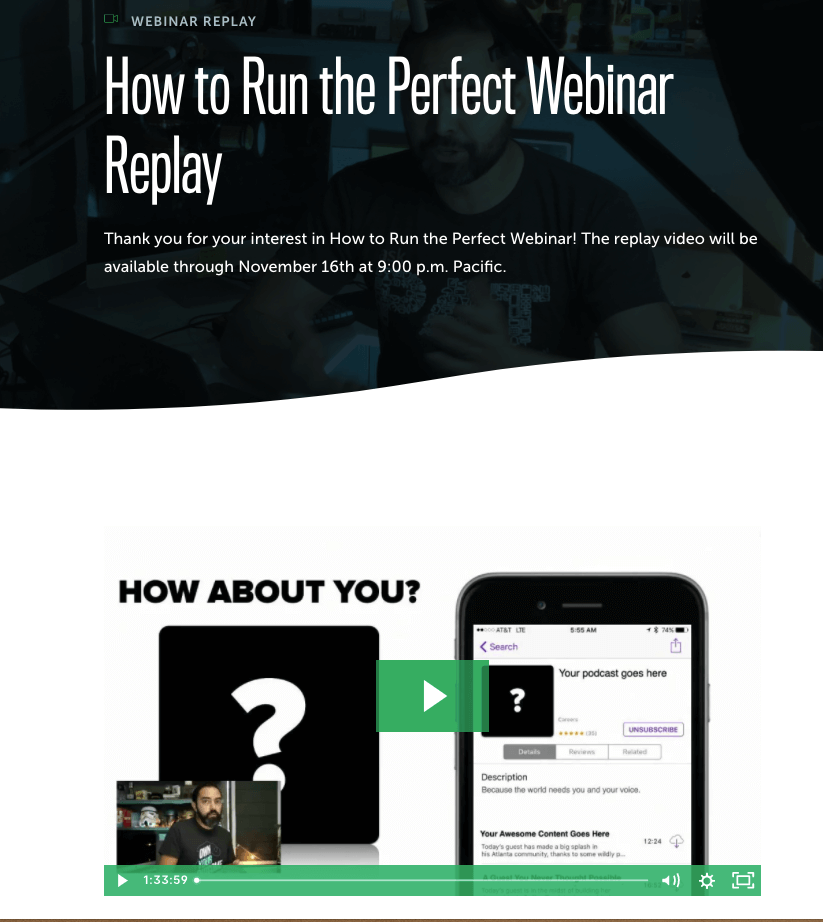
Regardless of how you post the webinar, you should treat it like a special event that people can only access through your email marketing sequence. You put a lot of work into creating your webinar, and it’s a valuable resource for anyone who joins, even if it is prerecorded!
Ready to dive into building your email follow-up sequence now? Not so fast! I have one important warning for you before we get to that stage of the process.
The Thing You Must Do Before Sharing Your Prerecorded Webinar
Before you go down the road of webinar follow-up, a big warning. You see, there are software solutions out there that let you upload a pre-recorded webinar and make it look like it’s live. That’s right: you can have people register for your webinar, and when they log in they’ll see other (fake) attendees, fake chat, you name it. Just like the real thing, right?
I’m not a fan at all. I’m all about authenticity, and not pretending that your recorded webinar is happening live.
That’s why there’s one crucial thing you need to do before sending anyone to your on-demand webinar: let them know that it’s not live. You want to make sure there’s no confusion about what people are getting. Whatever the format of your original webinar—but especially if it was very interactive—you have to let people know upfront that it’s not live, or they’re going to be in for a rude awakening (and it’s your reputation and bottom line that will suffer).
Okay! With all of that out of the way, let’s dig into the details of what your webinar email follow-up sequence should look like.
Building Your Webinar Email Follow-Up Sequence
With that out of the way, let’s talk about your email follow-up sequence. What should this sequence look like? In its basic form, it’s a five- to seven-day sequence with one email per day, except for the last day, which will have more emails.
Your mileage may vary, but we’ve found that five to seven days is the sweet spot. Anything longer works typically only if it’s a really major launch, a once-a-year type of thing. But if it’s something you launch just a few times a year, then five to seven days should be fine.
When should this sequence begin? In general, it should start the same day of the webinar, shortly after it ends. We’ve also found that closing the sale after a weekend, on a Monday or Tuesday, gives people the weekend to think about the offer and can lead to higher conversions.
Pro tip: If you’re using a tool like Demio, you can automatically generate a link to a new page with a replay video, or embed the replay on an existing page on your site with more information about your product/offer.
Here’s an example of how you could build a five-day email sequence. This sample sequence is taken from our Email Marketing Magic course.
Day 1, Email 1:
The first email announces the official launch period for your product and mentions that the cart is now open (or that the special promotion is now available) to purchase it. It also lets people know when the launch period ends, and highlights whatever is going away at that time, whether it’s access to the product, the discount, and/or any special bonus.
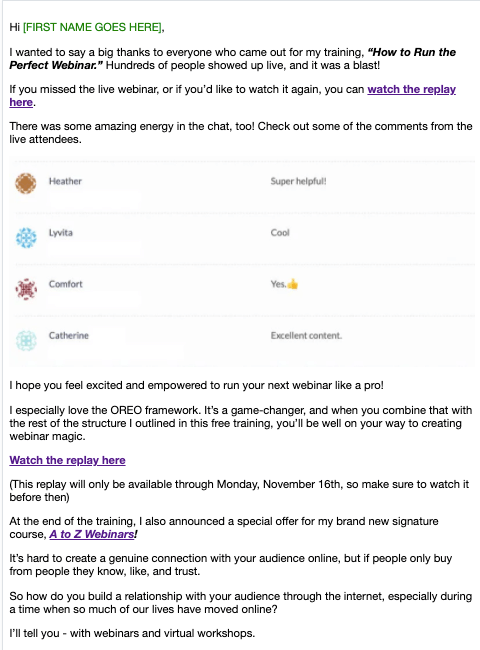
Day 2, Email 2:
This email builds on the first one by providing evidence that the product or opportunity you’re sharing is actually going to work for the subscriber. You do this by sharing a quick win they can achieve themselves, a story of someone just like them who is now succeeding as a result of what you’ve taught (a testimonial, but with context), or a combination.
Day 3, Email 3:
This email is probably the most important email in the series. If a person hasn’t purchased yet, this email addresses all of their potential objections. If you can tackle each of these objections head on and flip them on their head, you’re going to convert very well.
Day 4, Email 4:
This email tells your reader why they have to act now—not just because the promotion is ending or the bonus is going away, but because if they don’t take action now, they’re still going to be dealing with the same struggles they had before. Use your own style to amplify the consequences of not taking action in this email.
Day 5, Emails 5, 6, and 7:
The last day is the most important day of the sequence because that’s when we usually see 50 to 60 percent of sales—which is why we send up to three emails:
- Early morning: “Last day to get access!”
- Around Noon: “I recorded this video just for you” (this one is optional—but highly effective!)
- Early evening: “Final chance! _______ closes at ______”
These emails are mostly short and to the point, except for the second one. The first email in the morning, email 5, is a quick, final reminder that this is the last day to take advantage of your offer.
Email 6 goes out around midday. The subject line of this email says “I recorded this just for you.” It’s a short email that says something like, “Hey, I know you’ve been thinking about taking advantage of our offer. Click here to see a quick video message.”
It links to an unlisted YouTube video. That way it’s free to host and easy to access if you have the link, but can’t just be found by a random person searching on YouTube. So what goes into this video? It should just be one to two minutes, recorded on your phone and not highly edited or produced. Just a simple, heartfelt one-on-one message from you to the prospect. Make sure to include a link to the offer in the email and the video description itself.
This email typically has a very high open rate.
Email 7 goes out with a few hours remaining, with a last-chance reminder about your offer and any bonuses that might be expiring. This last email typically is our best performing email.
I know it sounds crazy to send three emails in a single day—and trust me, I felt the same way at first. But it can work pretty well, so don’t be afraid to give it a shot.
While most people who get these emails won’t actually click on the links, each email provides an additional touchpoint with them, and the more touchpoints you build up, the more likely a person will eventually click and take advantage of your offer.
And that’s how you create an email follow-up sequence for your webinar! This sequence on its own can be a powerful way to get people interested in purchasing your offer. But there’s more you can do to enhance how well it performs.
Expert Level Webinar Follow-Up: Three Tactics
So you’ve got your email sequence set up. There are a few more things you can do to take things to the next level.
Expert Tactic #1: Segment Your Audience
When you’re thinking about following up with people after a webinar, there are three different buckets to be aware of:
- people who showed up
- people who registered but didn’t show up
- people who didn’t even know about the webinar in the first place
You’re going to guide these folks through a funnel that involves viewing the webinar recording, then giving them the opportunity to take advantage of the offer you shared during the webinar. Are you going to drop everyone in those three groups at the same point in the funnel? You could, but it might be smarter to customize things a little. Here’s how to think about it.
Group 1: People who showed up
These people are the warmest when it comes to potentially taking advantage of your offer.
Group 2: People who registered but didn’t show up
This group is the next warmest. Not everybody who registers for your webinar is going to attend. So the first thing to focus on in your followup sequence is to encourage these people to view the webinar recording.
Group 3: People who didn’t register for the webinar
This final group is the coldest. They may or may not have known about the webinar, weren’t able to register for some reason, or simply chose not to register. You want to talk to them as though the webinar is new information.
So you have these three buckets of people—should you be sending them the exact same emails? Ideally, no. Instead, sending unique messages to each group of people will probably be more successful at getting them to take action.
- For group 1, since they’re already warm, you can go right to talking about your offer, with less emphasis on the webinar replay.
- Group 2 is a little colder, so your first email should have a bit more emphasis on the replay and less about the offer.
- For group 3, the people who didn’t even register, you want to lead off with a strong pitch on what they missed out on so they’re incentivized to watch the replay. Mention of the offer can come later.
You could set up three different funnels, or just drop people in each group into different points along a single funnel.
Expert Tactic #2: Put Automations to Work
You can take advantage of automations in your email service provider to customize the path each person takes through your sequence based on their actions.
The simplest automation is one that stops sending emails to someone once they purchase your offer. Obviously someone who buys doesn’t need to get any more sales emails from you!
Another automation you can implement using ConvertKit or another email service provider is to keep track of who clicks on the sales page link in any of your emails but doesn’t purchase. Since these folks are pretty warm, you can jump them right to the video email (Day 5, Email 2).
Expert Tactic #3: Host a Q&A
It might also be a good idea, depending on factors like the size of your launch and your availability, to host a Q&A session about your webinar and offer. There will likely be a lot of people who have questions—and a lot of them will have the same questions. Answering those questions in a live session could mean the difference between people buying and not.
A live Q&A can also be a good way to create more urgency around your offer and any expiring bonuses or discounts. You can incorporate an announcement about the Q&A into your email sequence.
Making Your Webinar Evergreen
There’s one more strategy to talk about in this section, and that’s using your webinar replay to create what’s called an evergreen webinar—taking a one-time (or infrequent) event and turning it into something you can promote throughout the year and that people can access whenever they like.
The beauty of making your webinar evergreen is that you don’t have to worry about putting a whole bunch of time and effort into repeating a live event. You’ll still need to put time into preparing your recorded webinar, as we covered earlier in this section, then creating an automated marketing campaign that can run largely on its own.
So what’s the reason you’d want to make your webinar evergreen? Possibly the greatest benefit of an evergreen webinar is more consistent sales throughout the year. If you only host your webinar twice a year, the stakes are pretty high. If you don’t convert people to your offer very successfully at either of those events, then you could be in trouble.
On the other hand, an evergreen webinar may have a lower overall conversion rate because it’s not live and it’s more readily available. But this is balanced out by the fact that because you’re keeping the sales funnel open, you can get a steady drip of sales throughout the year, which may provide more reliable revenue.
In addition, making your webinar evergreen can provide not only steadier sales, but allow you to collect data and perform analytics in an ongoing fashion. This lets you see what’s working and what’s not, and make adjustments as needed.
How to Make Your Webinar Evergreen
So we’ve covered the main benefit of turning your webinar into an evergreen event. Let’s talk about the nuts and bolts now.
The mechanism behind an evergreen webinar strategy is pretty straightforward:
- Create a lead magnet related to the topic of your webinar that incentivizes someone to subscribe to your email list.
- Guide them along an email sequence that educates, builds trust and credibility, guides them to check out your webinar replay, and promotes the offer you share in conjunction with the webinar.
(By the way, you’ve probably figured this out already, but making your webinar evergreen helps you reach a much wider audience, including the people in group 3 from earlier—the ones who didn’t register for the original webinar, and may not have been aware of it.)
What about timing? Should each person get immediate access to the webinar as soon as they register and download your lead magnet? The short answer is you’ll have to use your best judgment. In some cases it might make sense to give people access to the webinar right away, and at other times it might be better to develop a relationship first, prove yourself, and establish trust before giving them access to the webinar content.
As an example, we offer an on-demand webinar to help promote our Power-Up Podcasting course. The webinar helps people go deeper into what they learned in the lead magnet they download when they join our email list, called the Podcast Cheat Sheet. The Cheat Sheet gives them a comprehensive technical checklist with everything they need to start their podcast. It also mentions the on-demand webinar, which builds on the concepts in the cheat sheet.
When someone downloads the cheat sheet, which works as a teaser or supplement to the webinar, it’s a signal that they may be ready to learn more about this topic. In this case, it makes sense to give people the option to join the webinar sooner than someone else who joins our email list through a different route.
Bonus Evergreen Webinar Expert Tactic: Add Custom Countdowns with Deadline Funnel
If you want to put another notch in your webinar marketing belt, especially when it comes to your evergreen webinar strategy, you can use a tool my team and I love called Deadline Funnel.
Deadline Funnel is an amazing tool that allows you to create a launch-like sequence for any individual who performs an action that starts a countdown process. The beauty of this approach is that Deadline Funnel can customize the timing of any promotions, discounts, or bonuses related to your offer. This means you can scale your webinar promotion by giving each person their own “mini-launch!”
For instance, say Person A subscribes to your email list today and receives a lead magnet. This action also starts a countdown for an offer to purchase one of your courses for a special discount in a limited time window. Another email follows shortly after telling them they have forty-eight hours until the promotion goes away.
Person B subscribes the following day, and they get the same sequence, but their countdown starts on that day.
Deadline Funnel does this using cookies stored on the person’s device. You can even insert personalized countdown timers into your emails and your web pages, and the timers will synchronize across these various locations.
If a person clicks a link after the promotion ends, they’ll get a message saying that the promotion has expired; the price will revert to the regular price or they’ll lose access, depending on how you set up the offer.
Check out this session of the SPI Podcast where Amy Porterfield dishes on building evergreen funnels:
Build Relationships First
Whether you’re inviting people to a live webinar or guiding them to a prerecorded one, you’re asking them for a lot—usually at least an hour of their time and attention. That’s why it’s so crucial to think about the bigger picture and focus on first developing a relationship, demonstrating your expertise and authority, and providing some quick wins. Once those foundations are in place, people are more likely to go from your content and emails to a longer-form event like a webinar where you can establish a deeper relationship and hopefully spur them to take further action with you.
In the final section, we’re going to cover all the potential things you might do wrong when it comes to your webinars—so you can avoid any webinar pitfalls!
Webinar Mistakes to Avoid
When you’re preparing for, delivering, and unwinding from a huge event like a webinar, things are bound to go less than perfectly. It’s just life. But it’s also nice when you can know some of the pitfalls that might await, so you don’t have to deal with them! That’s why I’ve compiled a master list of the webinar mistakes you might encounter at some point in your webinar journey, so you can hopefully head them off at the pass. I’m rooting for you!
We’ll cover the critical mistakes you need to look out for at all three phases of your webinar journey. Then before we say goodbye, I have one more exciting opportunity to share with you.
All right, let’s get these webinar mistakes out of the way!
Pre-Webinar Mistakes
There’s a lot to do before your webinar to make sure it goes off perfectly. Which means there’s a lot of ways to mess up your webinar before it’s even started! I’m messing with you, really. You’ll be fine once you go through this list of pre-webinar mistakes to avoid.
- Your topic sucks. Let’s be real: your webinar needs to be something that people actually, you know, want to show up for. A great webinar is built around the needs, wants, and intended outcomes of your target audience, so if you haven’t done the legwork to learn what your audience wants, your webinar is not going to be as successful as you’d like.
- You’re not promoting it enough. Giving yourself a few weeks of lead-up is great, but not if you don’t actively promote the webinar during that time. You need a solid webinar marketing plan, so read up on how to do that if you haven’t already.
- You’re not giving yourself enough lead time. If you don’t allow enough time for people to learn about your webinar and register, you’re just not going to get as many signups as you could. One week is the bare minimum, and two or three weeks is better.
- You’re giving yourself too much lead time. While giving yourself too little time to market your webinar is a bad idea, too much can also backfire. Anything more than three weeks, and people’s interest and attention can start to wane. Stick with a sweet spot of two to three weeks.
- You’re not incentivizing people to join. The webinar itself should be amazing, but it doesn’t hurt to give people a little boost to get them to attend. You can do this by sending a lead magnet or bonus when people sign up (to incentivize people to register), and by promising a special discount, bonus, or other resource that you’ll reveal toward the end of the webinar (to incentivize them to stick around).
- You’re not sending reminders to attendees. Getting people to register is great, but you can’t just assume they’re going to remember to show up at the right day and time. You need to send reminders leading up to the webinar, including (and especially) the day of!
- You’re not using an add-to-calendar feature. Make it as easy possible for attendees to remember when your webinar is happening. One simple way to do that is to provide an add-to-calendar feature in your email reminders (see above). Demio and most other webinar platforms provide the ability to do this.
- You’re scheduling at the wrong day/time. Most of the resources out there seem to suggest that scheduling a webinar midweek (Tuesday, Wednesday, Thursday) and around the late morning or early afternoon (but watching out for lunch hour!) in your target audience’s main time zone is the way to go.
- Your marketing messaging is ineffective. You need to sell people on your webinar, even if it’s free! All of your webinar marketing materials need to explain clearly and succinctly the purpose and outcome of the webinar. Check out the marketing section for more.
- You don’t practice your presentation. Underpreparation can sink even the most promising webinar. You need to map out a clear path from initial engagement with the viewer to getting to the payoff at the end—then you need to practice it before going live. It’s fine to leave moments during the webinar when you can speak off the cuff—but not for the whole presentation!
- Your registration form is too long. The webinar registration form can seem like an afterthought. But be careful you’re not asking for too much information when people sign up—name and email address should be sufficient. Unless you really need to know their pets’ names, keep it simple and avoid creating a roadblock right before the finishing line.
- You have too much content. How many slides do you have in your presentation deck? If you need more than two or three hands to count all of them, it’s time to rethink things. And will your audience members be calling their optometrist to get their prescription checked after trying to decipher the text on your slides? Practicing your presentation in front of friends or team members is a great way to get feedback on what to cut, but generally speaking less is more when it comes to your content.
- You’re overpracticing. Don’t stress about delivering a “perfect” webinar, especially on the first go! It takes time and practice to build up your webinar muscle. Practicing is obviously important, but overpracticing is likely to just make you nervous about making mistakes. It’s fine to make mistakes, even in front of a crowd—it means you’re human!
- You’re trying to do it all yourself. Preparing for a webinar is a lot of work! If you have a team, let them help you with the technical stuff (ordering equipment, setting up your webinar platform, etc.) so you can focus on getting ready for delivering an awesome webinar.
During-Webinar Mistakes
Guess what? Even after you eliminate all the possible pre-webinar gaffes and misses, there are also a lot of mistakes you can make during your webinar! Thankfully, they’re all things you can address—some with a little more prep, and some with a change of strategy during the webinar.
- You’re winging it. Practice, practice, practice. Nuff said.
- You’re going over (or under) time. People are giving you their time, so keep your webinar to the promised length. If you go too long, people will run out of motivation to stick around. If you run short, people will feel short-shrifted. And not staying within the promised time window may even diminish people’s trust that you’ll stick to your word. A lack of practice is usually a big part of the issue here, so, you know, practice.
- You’re not using the right equipment. Using the right hardware is crucial to a good webinar experience for you and your attendees. While you don’t need the most expensive microphone, web cam, or lighting setup, it helps to invest a little in equipment that will help you look and sound more professional.
- You’re not recording your webinar. Do you even evergreen, bro? Your webinar recording is a valuable resource you can use to create an on-demand event you can run multiple times throughout the year, or even on an ongoing basis. Make sure your webinar platform gives you the option to create a high-quality recording.
- You’re not making it interactive. With all the options to involve and engage your audience using current webinar platforms, there’s no excuse not to make your webinar interactive. Trust me: people love to have their voices heard, so give them a chance. It’ll improve everyone’s experience immensely.
- You’re pitching too much. I’ve been to my share of those webinars—the ones that stir with a few minutes of story followed by 45 minutes of a pitch for some product or course. What’s missing? Valuable insights and actionable content your attendees can get excited about putting to use in their businesses right away.
- You’re not providing a CTA. A webinar is a great way to educate your audience and promote a product or service if you like. And while there’s no requirement to be selling anything on your webinar, you should still give your audience a next step, some way they can continue to take action with you
- You’re not looking the part. Your office is messy. Your shirt has a ketchup stain on it, and you’ve got that just-rolled-out-of-bed hair. Oh, and you didn’t lock your door, and your kids are playing right outside and could bust in at any minute. I totally get that it can be hard to create the “perfect” setting and appearance for your webinar (after all, you do want to appear human)—but do what you can to look professional and minimize the chances of a rude interruption.
- Your video and audio quality are lousy. Nothing can put the brakes on a great webinar like glitchy audio or frozen video. Make sure you have an adequate internet connection, shut off any unnecessary apps, and do a test run beforehand with a friend or your team!
- You’re not engaging with your audience. People have given you their time and attention, and you need to meet them halfway. If you’re just reading from a script and not asking questions or engaging the audience, you’re not giving people the experience they deserve—and wasting your own time, too.
- You’re taking too long to get to the good stuff. If you spend twenty minutes rambling on at the beginning of your webinar about who you are and what you’re going to talk about, you’re going to lose people. Don’t wait so long to provide value.
- You’re being a machine. While it’s not a great idea to ramble about yourself, especially at the beginning, it’s important not to be too impersonal. Share who you are, including your qualifications and personal story, at points throughout the show. These details can help establish trust and credibility when it comes to the topic of your webinar.
- You’re overapologizing. If you mess up during your webinar, say sorry, then get back on track and keep going!
- You’re using the wrong software. You need a bunch of features your current webinar tool doesn’t have. Or you’re paying for a bunch of features you’re not using. Demio is the tool we use because it delivers the webinar experience and features we’re looking for, but I want you to make the right decision based on your needs.
- You’re stressing too much! Yes, delivering a webinar (especially if it’s your first one) can be nerve-racking, but that doesn’t mean you can’t have fun, too! Remember to breathe, take breaks, let your guard down, and check in with your audience from time to time.
- You’re trying to do it all yourself (again). Delivering a webinar is a lot of work! If you have a team, let them help you with stuff like managing the chat window and addressing any technical difficulties so you can focus on giving an awesome webinar.
Post-Webinar Mistakes
Okay, you’ve avoided all the pre-webinar and post-webinar pitfalls. You’re in the clear, right? Nope! In many ways, your work has just begun, and more potential troubles await. But you’ve got what it takes to stay on the straight and narrow even after your webinar is over—I believe in you.
- You’re not learning from your webinar. Go back and watch the webinar replay to learn more and consciously improve! Get feedback from others too, like your audience and your team. You might get feedback without asking, but it’s a better idea to go looking for it.
- You’re not following up. If you’re not following up properly after the webinar, you’re missing opportunities to reach people who didn’t attend, who left early, or who didn’t even know about the webinar in the first place.
- You’re not analyzing your data. When it comes to building on and learning from your webinar, data is your friend. How many people registered and didn’t show up? How many people left early? What were the most popular questions asked during the webinar? Looking into all of these data points will help you understand what worked well and what could be improved for next time.
One Final Webinar Mistake to Avoid
Before we go, there’s one more webinar mistake I want to alert you to—well, it’s one we’ve already talked about, but it bears repeating…
- You’re trying to be perfect. Yeah, I know the list of potential mistakes you could be making with your webinar is pretty long. But here’s the thing: mistakes are fine, and you’re almost definitely going to make some, especially if your next webinar is your first one. So give yourself some credit. Your audience wants to hear and learn from you, the imperfect human, and have a human experience together.
Take Your Webinar Success to Greater Heights
I hope this guide has given you some handy tools, tactics, and insights to put to use in creating, delivering, and building on your own successful webinar!
I hope you’re excited to continue your webinar learning journey—and if you are, my brand new course, A to Z Webinars, is the perfect next step.
If this guide has helped you build your rocket, then A to Z Webinars is the rocket fuel you’ll need to fly even higher and take your webinar success to the stratosphere.
In A to Z Webinars, I’ll teach you how to create, promote, and run webinars and virtual workshops that grow your list, increase trust, and help you make more money.
I created A to Z Webinars because I want to show you everything I’ve learned over the past five years of hosting more than one hundred webinars, so you can make webinars and virtual trainings work for you, too.
This isn’t a course about what worked for me years ago. In A to Z Webinars, I’ll show you exactly what I’m doing today in my webinars to get the results I want. You can find A to Z Webinars inside the All-Access Pass.